Accept inquiries, create quotes, manage room inventory, register participants, generate BEOs - for group rentals and other events.
A rental is a relationship where you provide services - registrations, lodging, meals, meeting rooms - to an individual or organization (your client) so that they may conduct their conference, workshop, or meeting (the event) on your property.
It’s a business-to-business relationship.
Rental workflows typically include steps like:
- Inquiry - a potential rental client expresses interest.
- Quote - you describe your services and set a fee structure.
- Agreement - the event is scheduled, and a deposit is accepted
 .
. - Program - you build the event listing for viewing by prospective participants.
- BEO - you create a Banquet Event Order to share event details with your team.
- Registration - participants are engaged and complete the event.
- Invoice - your client receives a final statement and provides payment.
The following topics are covered in this article:
- Rental inquiry forms
- Automatic email notifications
- Viewing rentals
- Create a rental quote
- Information cards
- Details
- Event information
- Secondary form information
- Admin notes
- Availability
- Rooms
- Venues
- Pricing
- Line items on the quote
- Deposit required for booking
- Alternative payment
- Quote
- Create rental agreement
- Email link to the agreement
- Additional agreements
- Admin settings
- Email
- Create a custom email template
- Compose an email
- Email header and footer
- Email history
- Agreement acceptance
- Automatic actions
- Agreement history
- Program creation
- Automatic actions
- Rental quote pricing reference
- Rental information
- Configuration settings
- Rentals inquiry form links
- Inquiry form title and intro text
- Submit and Update buttons
- Page footer
- Thank you pages
- Rental email notifications
- Rental status
See also,
- Rental Program Reconciliation
- Configure a New Program
- Create or Edit Registration Questions
- Banquet Event Order (BEO)
Rental inquiry forms
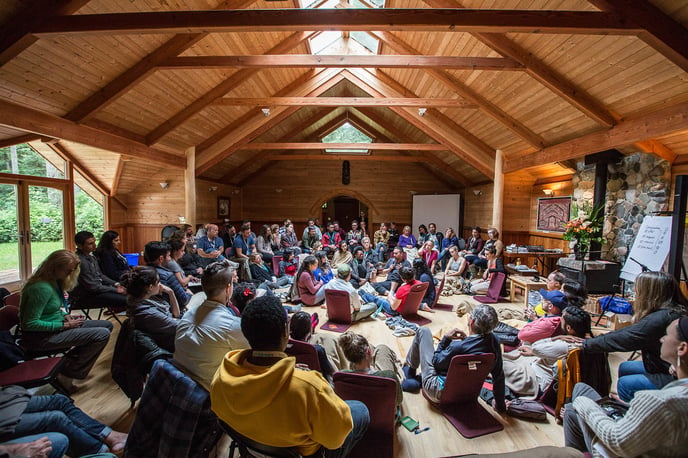
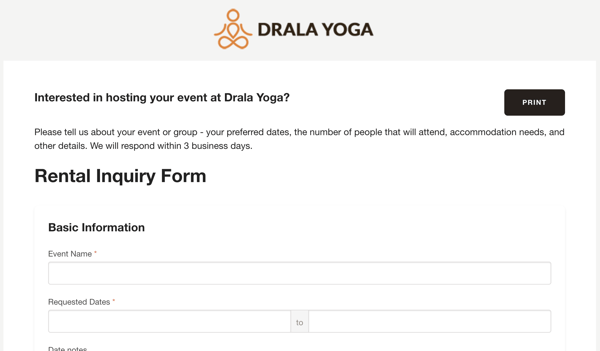
Welcome to our fictitious center named Drala Yoga. To help attract potential clients, Drala Yoga includes a Rent our center page on their website.

When a prospective client clicks on the INQUIRE NOW button, they are redirected from Drala Yoga’s website to an online rental inquiry form within Retreat Guru.

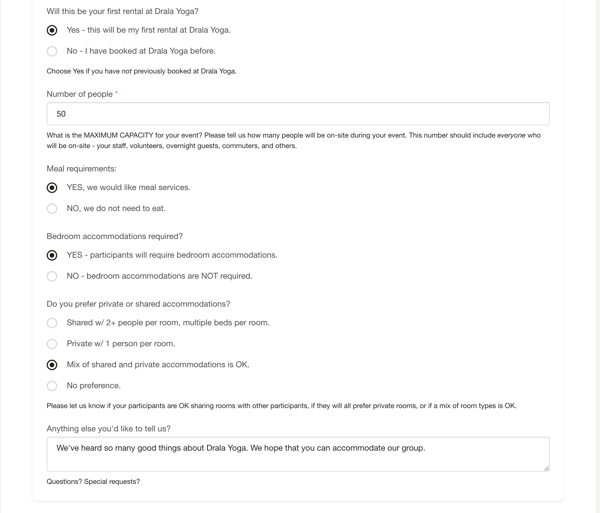
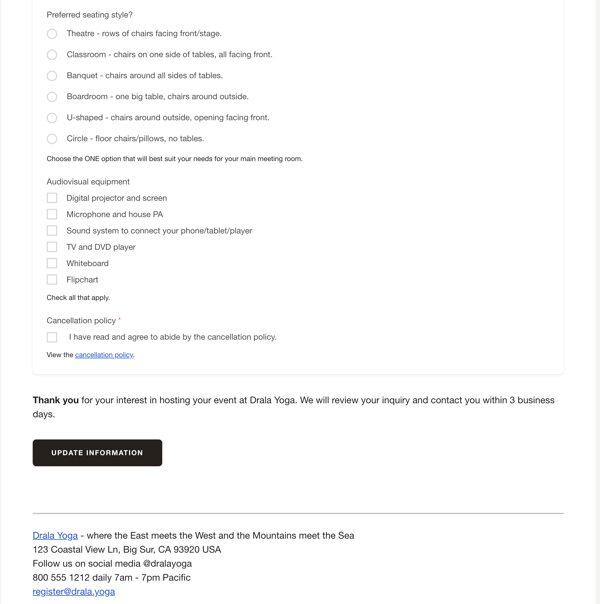
The online rental inquiry form shown above is a sample. You can easily design your own custom set of questions to meet the needs of your center.
Creating rental inquiry questions
Go to Questions > Rentals to configure questions for the Rental Inquiry Form.
See Create or Edit Registration Questions to learn more about configuring questions.

To create a question that will appear on the initial Rental Inquiry Form, go to Questions > Add New > Edit Question and set the Section to Rental Field and the Placement to Initial Inquiry.

Placement options also include Admin-only and Secondary form.
-
- Admin-only rental fields allow you to capture information about your client and the rental and restrict viewing of that information to your internal team.
- Secondary form rental fields facilitate a 2-step rental inquiry process.
The 2-step rental inquiry process
Some centers prefer a 2-step approach to the rental inquiry process where prospective renters first complete a screening form.
The screening form (initial rental inquiry) typically has only a few key questions to help you determine the basics.
-
- Do you have meeting space (venues) available?
- Do you have lodging (beds) available?
- Is this the kind of group you want to be on the property?
You can review the responses provided on the initial inquiry form to determine if you wish to pursue this prospect. If you decide to proceed, you can then send an extended (or secondary) inquiry form to those who pass the screening.
To configure a question to appear on this secondary form, set Placement to Secondary Form.

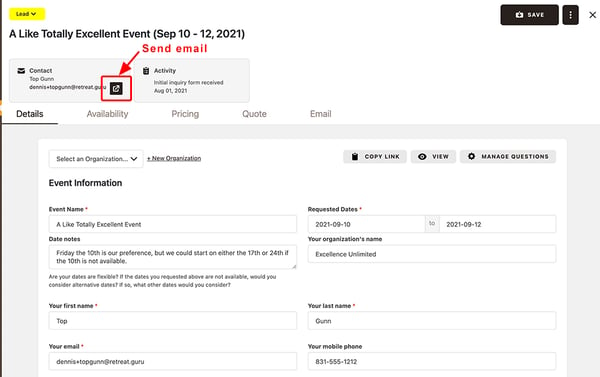
For example, a person called Top Gunn submitted an initial rental inquiry form. After reviewing the information that he included on the form, you decide to pursue the opportunity.
To view the inquiry, go to Rentals v2 > (choose the inquiry) > Details > Contact card.
To send an email to Top Gunn with a link to the secondary inquiry form, click on the send email icon on the Contact card.
We'll talk more about the organization of the Rentals section and common workflows in a later section. For now, let's follow through with the email example.
A new window will open.
You may choose a template for the email or type one from scratch.
In this example, we have selected a custom email that we created as to CLIENT - Rentals v2 link to secondary form. Custom emails may be created at Reg Settings > Email > Email templates > Custom email templates.
Notice that this email template includes the {{secondary_form_link}} template code.
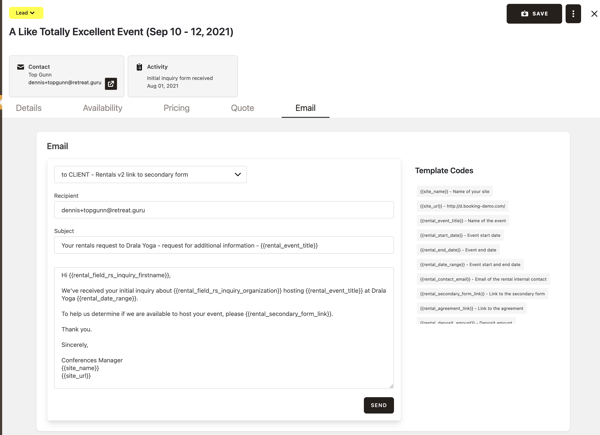
When you SEND the email, an entry will appear in the Email History section at the bottom of the page.

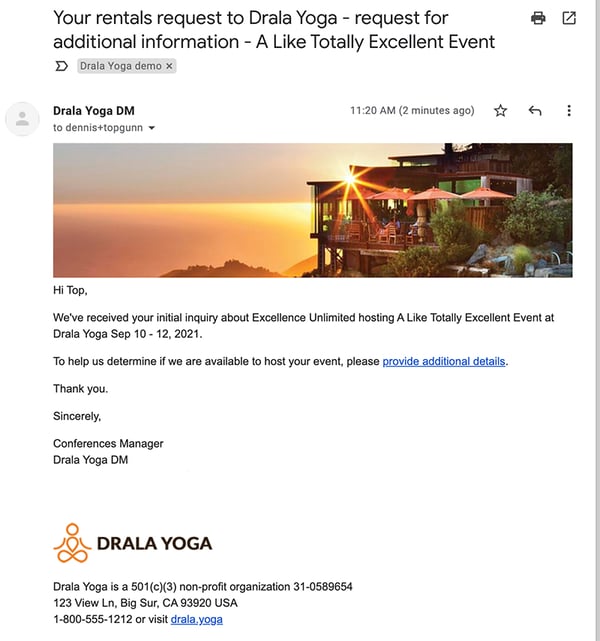
In this example, Top Gunn opens the email and clicks on the link to provide additional details - the link to the secondary form.
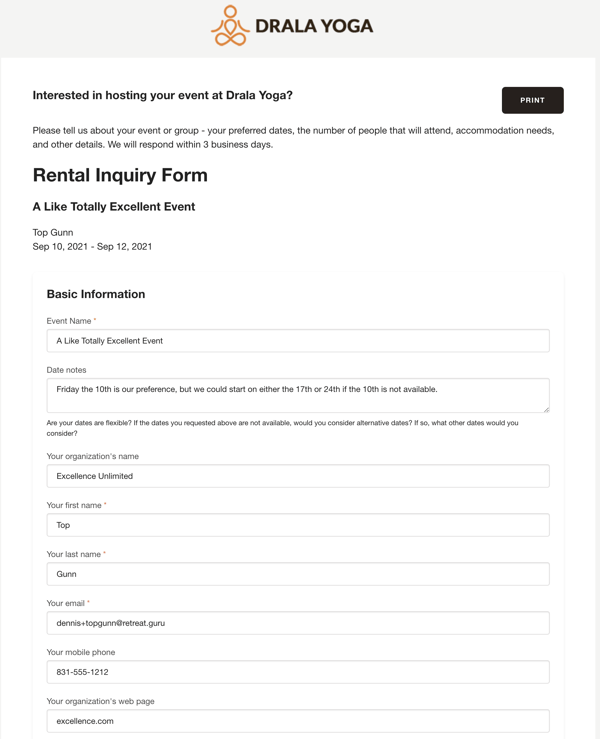
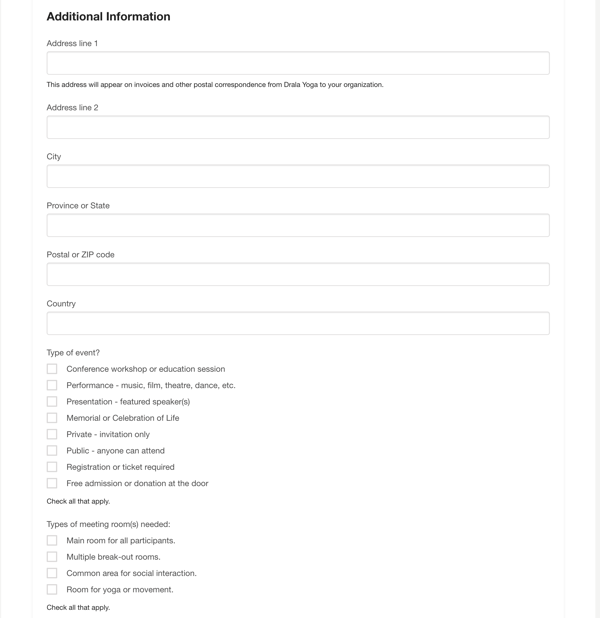
When Top Gunn clicks on the link to provide additional details a new window will open to display the inquiry form. This view includes the information he provided on the initial inquiry form, followed by a new section called Additional Information.

When Top Gunn completes the form and clicks on Update Information, a thank you page will be displayed and the rental details will be automatically updated in Retreat Guru.

Manually completing a rental inquiry form
If a prospect phones to inquire about bringing their event to your center, you can either direct them to the rental inquiry link on your website, or (as an admin user) you can manually complete an inquiry form on their behalf by asking questions during the call and entering their responses on the form.
Go to Rentals v2 and click on Add New Rental. You may complete both the initial and secondary sections of the form as required.

Automatic email notifications
Retreat Guru can automatically send email notifications to the address you specify as Admin Contact Email. You may also configure an Admin Email CC address.
See also, Sending Emails - Create Custom Email Templates.
Later in this article, we'll talk about manually sending emails via Rentals v2.
For now, go to Reg Settings > Rentals > Rental Email Notifications.

By default, admin notifications will be delivered to this address you specify for Admin Contact Email, and replies to customers will be directed here. This address can be customized per rental.
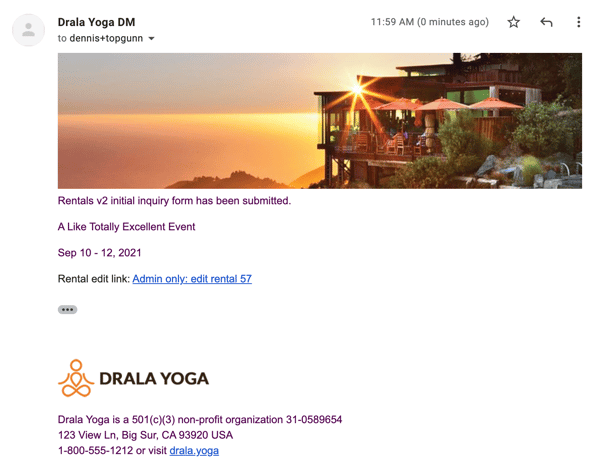
The image below shows a sample notification that was sent to your designated admin address when an initial inquiry form was received.
Viewing Rentals
Go to Rentals v2 to view a list of rentals, including a list of rental inquiries that have been received.
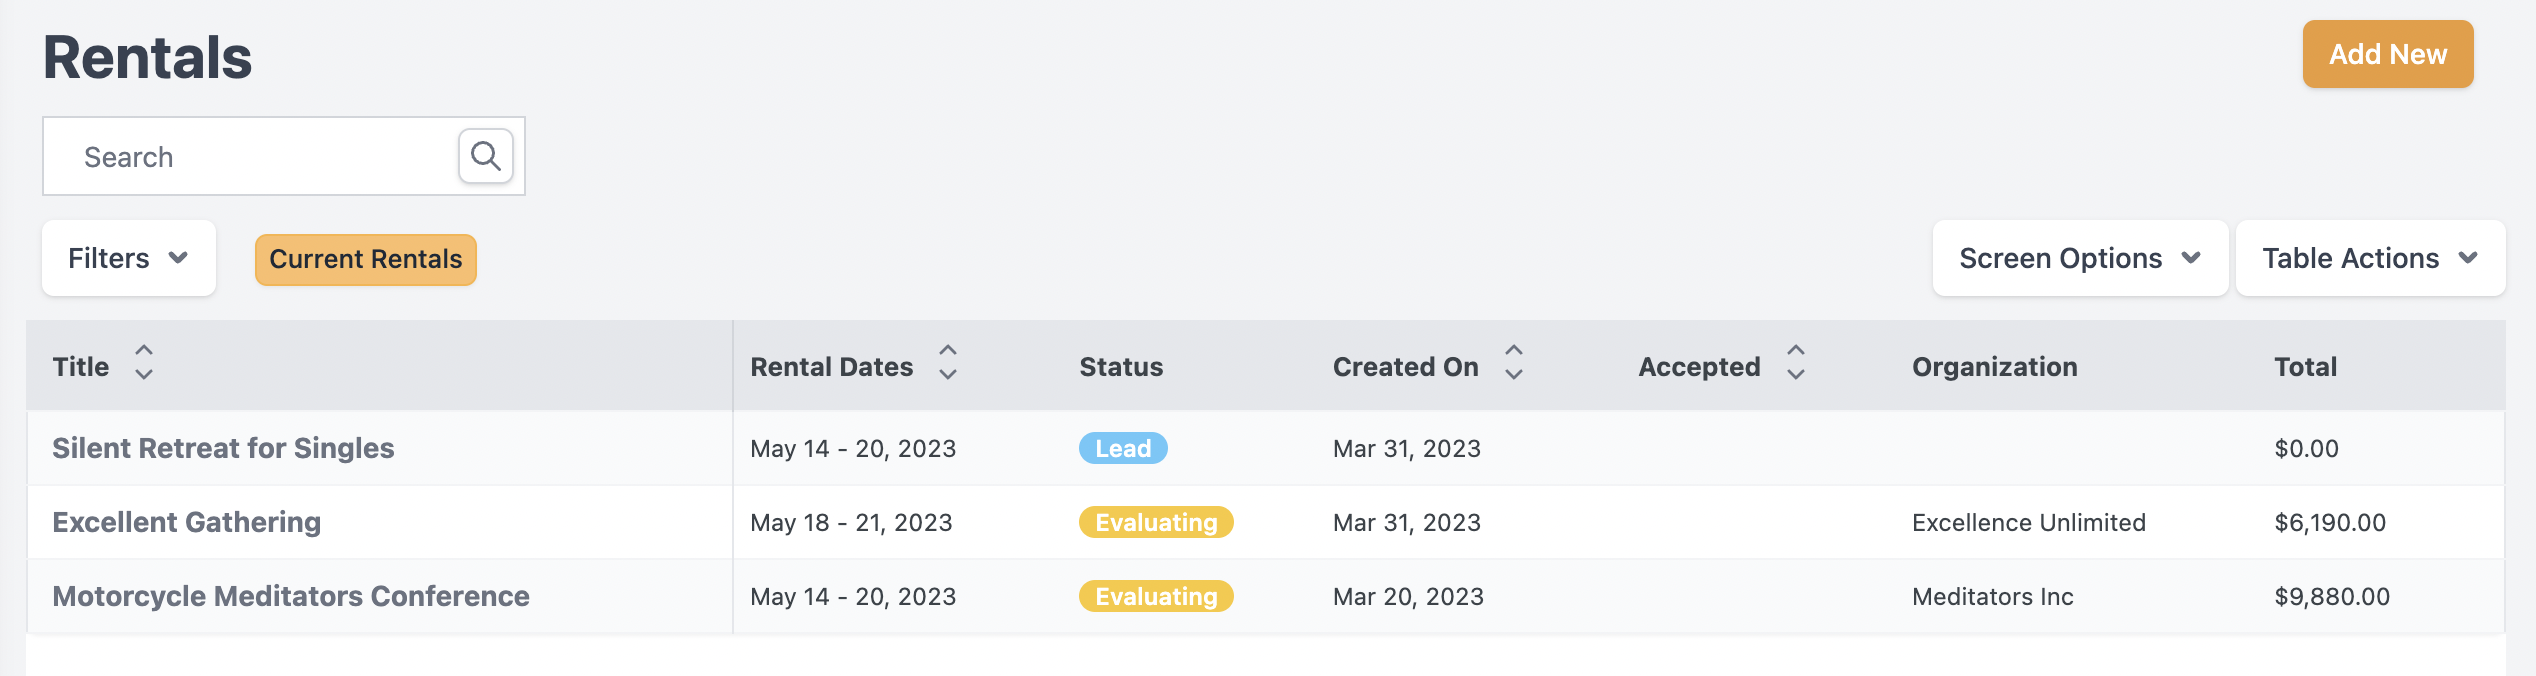
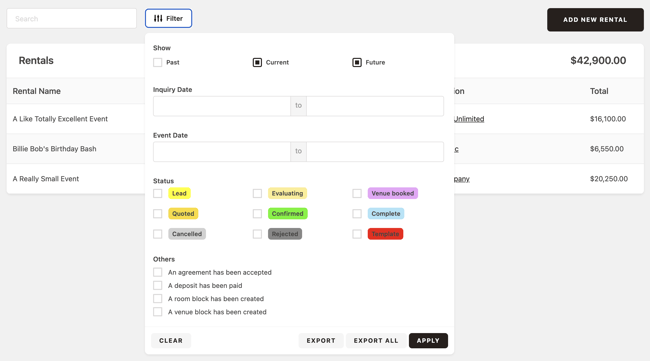
You can filter this list to show only rentals (inquiries) with a status of Lead or apply other filters to yield other views.
Create a rental quote
Go to Rentals v2 and locate the rental (inquiry) that you wish to configure. Use the filters if needed. Click on the rental name to view that rental.
Information cards
A series of information cards appear at the top of the page.
- Contact - from the rental inquiry form. A send email icon appears on this card.
- Program - appears when the agreement has been accepted, and a program has been automatically created. Once the rental agreement has been accepted, a link to the program for participant registration will appear on this card.
- Activity - displays date initial inquiry received, and date agreement accepted.
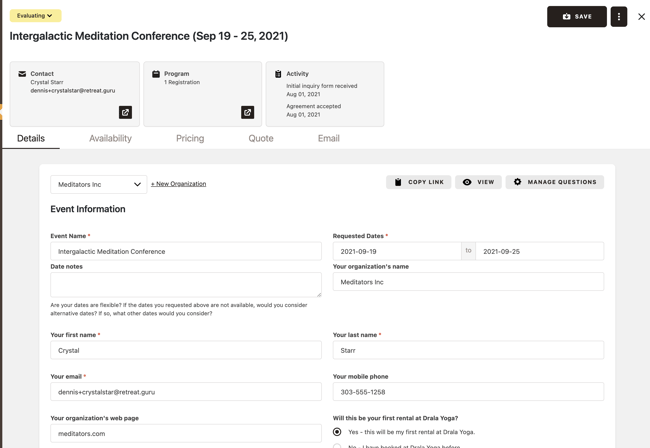
Details
The Details tab displays Event Information - responses from the initial inquiry form - and Secondary Form - responses from the secondary inquiry form.
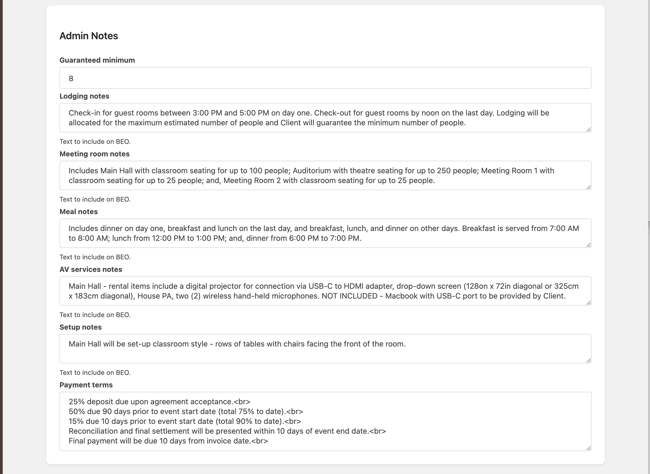
Admin notes
If you have configured custom admin-only fields (questions) they will appear at the bottom of this page in the Admin Notes section. As an admin user, you may edit the information saved in these fields.
Availability - rooms and venues
Configure the room blocks and venue blocks on the Availability tab.
- Room block - choose the rooms that you wish to reserve for this event.
- Venue block - choose the venues (meeting rooms) that you wish to reserve.
Rooms
Go to Rentals v2 > (Choose an event) > Availability > Rooms.
Click on Add and the section will expand to show your inventory of rooms organized by Room Type (also know as Lodging Type).
For reference, click on SEE ROOM BOOKINGS to view the Rooms Booking chart.
Click on the down arrow to the right of the Room Type (Lodging Type) to show the rooms available in that Type. When choosing rooms, you may select a room only once, under one Room Type. When you select a room under a Room Type, it will then appear as greyed out under other Room Types.
If a room can be sold in multiple Room Types, that room will appear multiple times in the list. This allows you to choose the way that you would like to sell the room for this rental event.
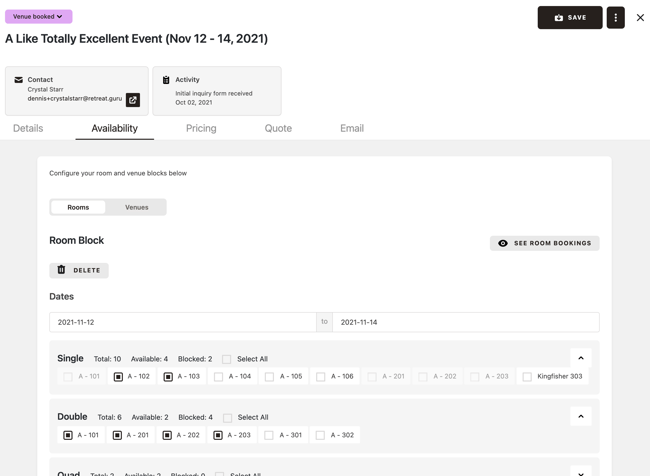
Click SAVE when you have created the room block.
Venues
Go to Rentals v2 > (Choose an event) > Availability > Venues.
For reference, click on SEE VENUE BOOKINGS to view the Venues chart.
The dates of use will default to the event dates (start date and end date). As an option, you may choose Custom Dates and enter an alternative range. If you choose Custom Dates, you may also Add New Date to configure multiple blocks for the venue.

Click SAVE when you have created the venue block.
Pricing
Go to Rentals v2 > (Choose an event) > Pricing.
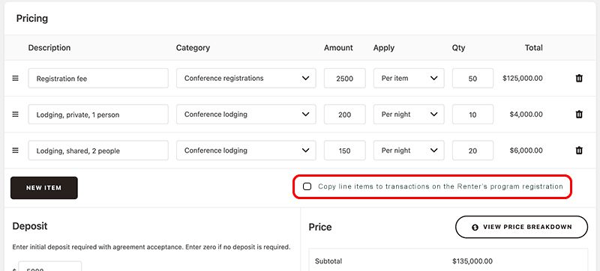
Line items on the quote
Enter the line items that will comprise your price quote for the event. The line items on this Pricing tab are for the rental quote only - they will not be automatically added to the package builder in the program used for participant registration.
Click on New Item to begin adding line items to the Pricing section. In the example below, we’ve added line items for registration fees, lodging, meals, and a daily environmental fee. You may grab the hamburger icon to the left of each item, and drag and drop to change the order of the listings.
The line items will be automatically totaled in the Price section on this page. Click on View Price Breakdown for a preview of the price quote.
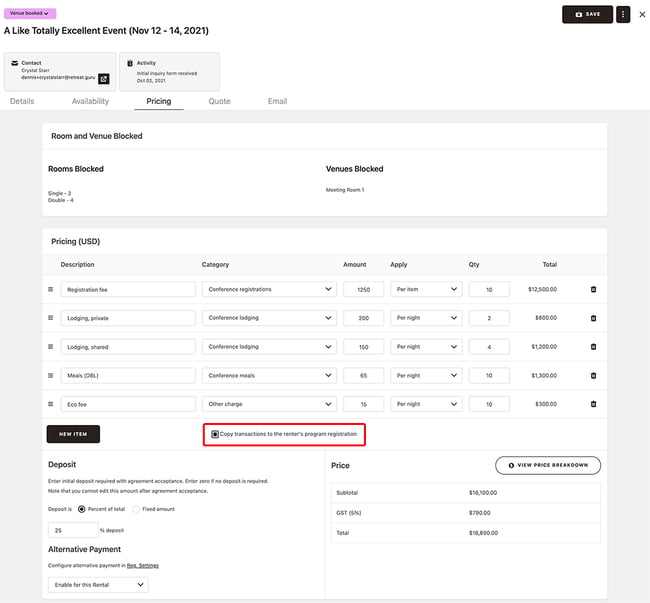
Copy transactions to renter's program registration
If the renter will be paying for all charges shown in the Pricing section, check the box next to Copy transactions to the renter's program registration. If this box is checked, Retreat Guru will add these transactions to the renter's registration when auto-creating the Program.
If you do not check this box, only the deposit (payment transaction) will be added to the renter's Program registration.
Deposit required for booking
If you require a deposit to secure the booking, specify that deposit on this tab. If you leave this deposit box blank, your client will be able to accept the agreement without making a payment.
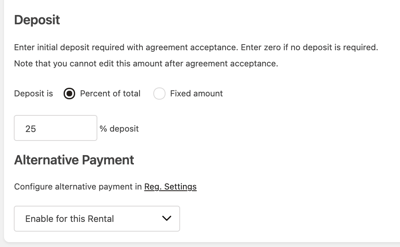
Alternative payment
If you wish to allow an alternative payment method - a payment method other than by credit card - you may configure the alternative payment in Reg Settings and enable that option on a rental-by-rental basis.
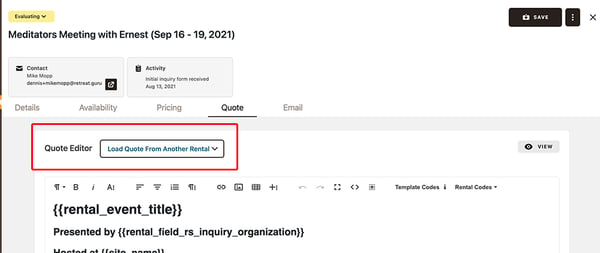
Quote
Quote Editor
You have 3 options to create the Quote for your prospective client on the Quote tab.
Copy a previous Quote
Use the drop-down menu at Rentals v2 > (choose a rental to edit) > Quote to copy a quote from a previous rental. Once copied, you may modify the text for the new rental.
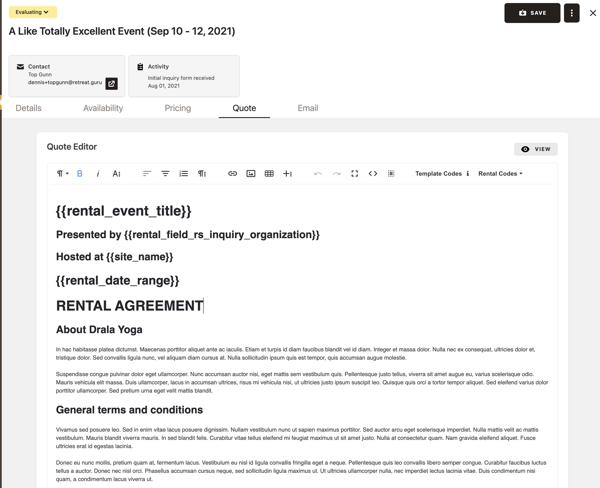
Enter text directly into the Quote editor
Type text directly into the quote editor to describe your services and rental terms, embed images, apply styling and formats, and include Rental Codes - template codes that will be replaced with information from the rental inquiry form and your admin-only rental notes when the quote is viewed.
Copy and paste content from an external text editor
If you copy and paste content from another source, ensure that the copied text includes only basic markup. Word processing applications like Microsoft Word often include (hidden) special formatting that can yield unexpected results when you copy and paste content from a Word document to your rental quote.
Go to Rentals v2 > (Choose an event) > Quote.
The Quote Editor will appear. Use the WYSIWYG (What You See Is What You Get) toolbar at the top of the Quote Editor to style the content - to apply a paragraph style, bold, italics, alignment, links, and more.

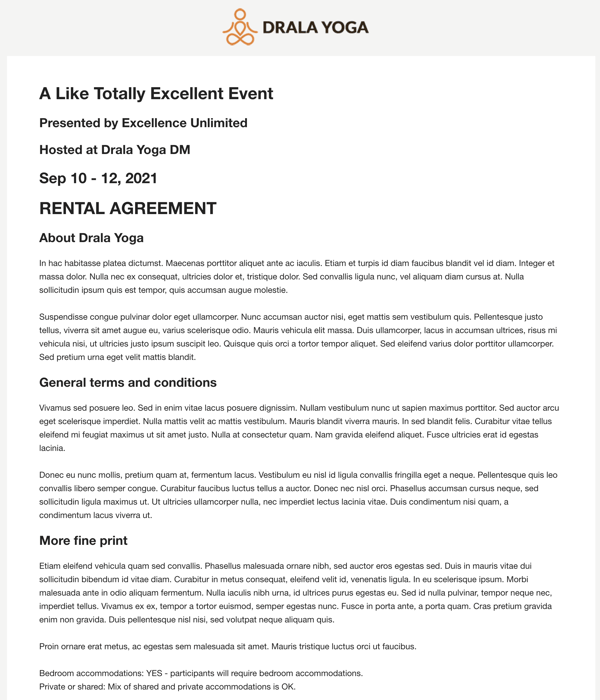
Enter text by typing in the box (where it says Type something), apply a format using the WYSIWYG toolbar, and insert template codes (from the Rental Codes drop-down menu) to create the quote (agreement) that will be presented to your client for acceptance.
A sample rental quote appears below. In this example, the WYSIWYG toolbar was used to apply formatting styles to certain template codes, headers, and other text.
Click on View to see a preview of this quote - a view similar to what your client will see.
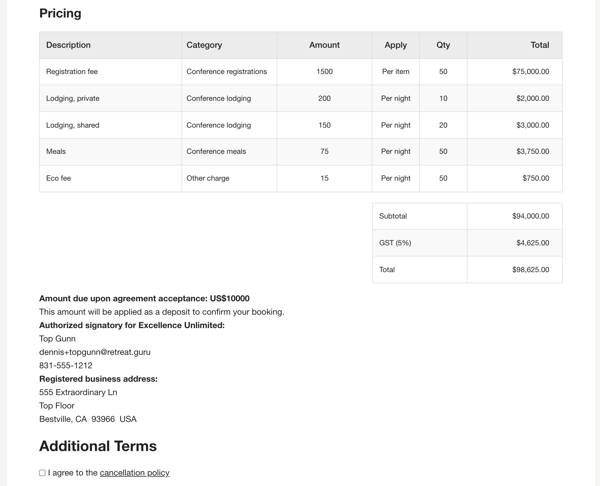
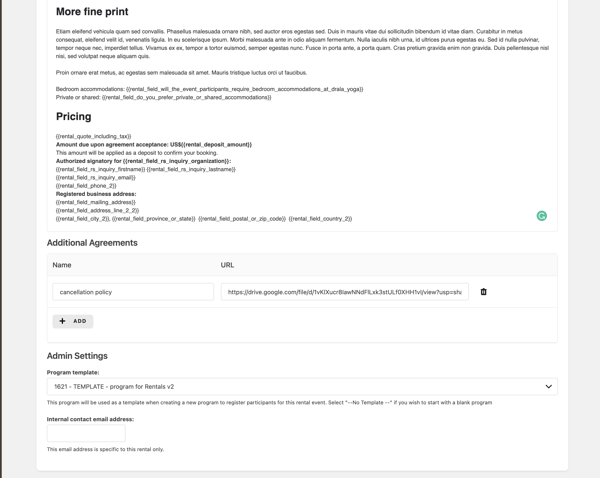
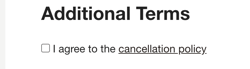
Additional agreements
Enter the titles for any additional agreements and the URLs to web versions of those agreements. These will appear with a checkbox on the agreement presented to your client.

When you include one or more Additional Agreements, the checkbox(es) must be checked by your prospective client before the agreement can be submitted.
Admin settings
Go to Rentals v2 > (Choose an event) > Quote > Admin settings.
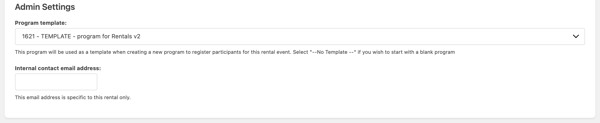
In Admin settings you may choose a program from the drop-down list to use as a template when creating a new program to register participants for this rental event. Select --No Template-- if you wish to start with a blank program.
Enter an email address for the person who should receive email notifications related to this rental. This person is usually a member of your center’s conferences and events team or a person with similar responsibilities. If the box on this page is left blank, the default Registrar's address (from Reg Settings) will be used.
Create a custom email template
See also, Sending Emails - Create Custom Email Templates.
Go to Reg Settings > Email > Email Templates > Custom Email Templates.
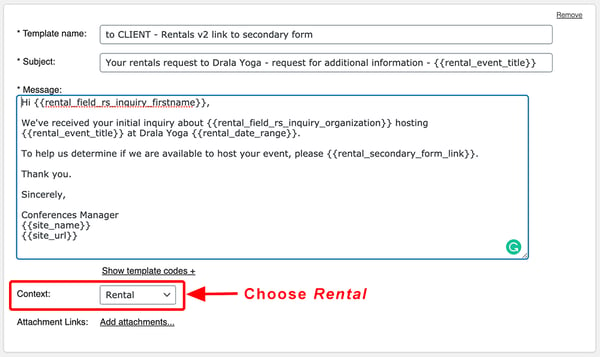
Choose Rental as the Context for the email. The context of Rental will make this email template available in the drop-down menu within Rentals v2.
When you choose Rental as the email context, the template codes that are available in the Show template codes drop-down are specific to those relating to Rentals v2.
Compose an email
The Email tab provides a convenient way to communicate with your client.
Go to Rentals v2 > (select a rental to edit) > Email.
Select a pre-defined email template from the Choose a template drop-down menu or create a new email from scratch.
Or, use the drop-down menu to select a template as a starting place, and make modifications to tailor a copy of that template content.
Once you select a template, the template content will be copied into the email you are currently editing - making changes to this copy of the template content will not change the original template content.
You may highlight, copy and paste Template Codes from the right-hand sidebar.

In the image above, the template code {{rental_secondary_form}} will insert a link into the email that your prospective client can follow to view the Secondary Inquiry Form to provide additional details about their rental request.
Email header and footer
The email header and footer that you define globally at Reg Settings > Email > HTML Email Wrapper > Header and Footer will be applied to emails sent via the Rentals v2 section.
Email history
Go to Rentals v2 > (select a rental to edit) > Email > Email history.
A link to a copy of every email sent from within the Retreat Guru Rentals v2 feature will appear in this email history section. Click on view email to see the result.

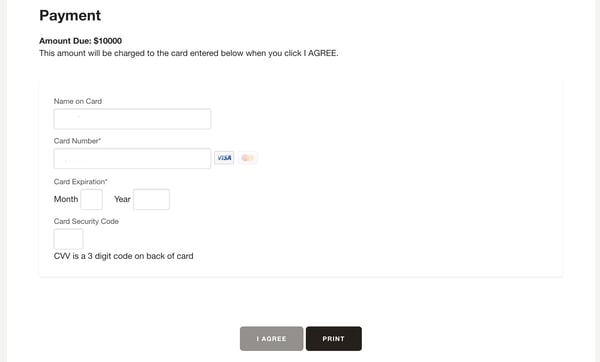
Agreement acceptance
When your client accepts the rental quote by providing a deposit (if required) and clicking I AGREE, Retreat Guru will automatically complete the following actions.
Agreement history
When the agreement has been accepted by your client, a new section will appear at Rentals v2 > (choose a rental) > Quote > Agreement history.

Program creation
When your client accepts the rental quote by providing a deposit (if required) and clicking I AGREE, Retreat Guru will automatically create a program for participant registrations.
Automatic actions
- A new program for participant registration will be created using, as a template, the program specified at Rentals v2 > (choose a rental) > Quote > Admin settings > Program template. The newly created program will be marked as DRAFT.
- The renter will be registered for this new program.
- The rental deposit (if applicable) will be applied to the renter's registration for this new program.
- An option will be provided to use the pricing table from the rental to create transactions on the renter's registration. At Rentals v2 > (choose a rental) > Pricing select the checkbox next to Copy line items to transactions on the Renter's registration to activate this option.
- The Room Blocks and Venue Blocks that were created in the Rental will be transferred to the Program as Program Restricted Room Allocation type.
- The Lodging Types used when creating the Rental will be automatically selected at Programs > (select program) > Pricing > Lodging Prices.
- Rental inquiry fields and admin-only rental fields will be available to the program. For example, you can include those template codes in a Banquet Event Order (BEO) to easily share this important information with your team.
- (Future feature) The program will be associated with the Organization (from the rental). If an organization doesn’t exist, a new organization will be created.
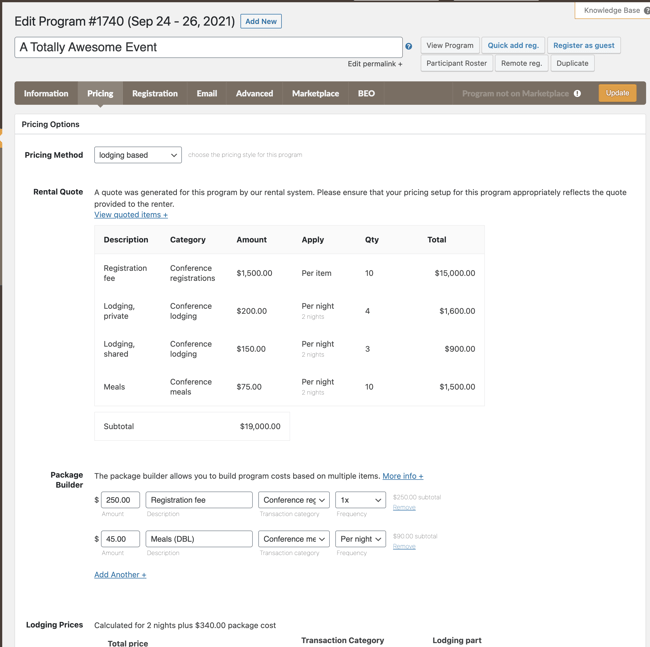
Rental quote pricing reference
A new section will appear at Edit Program > (choose the program associated with the rental) > Pricing > Rental Quote.
An image of the pricing section from the associated rental will be displayed. This information is for reference only.
Updates on the associated rental's pricing tab will be automatically reflected in this Rental Quote information display.
Rental information
A new section will appear at Edit Program > (choose the program associated with the rental) > Information > Rental Information.
- View Rental - opens the Rentals v2 configuration page.
- View Agreement Acceptance - shows details of agreement acceptance including date and time, location, and technical information about the device used.
- View Rental Registration - link to the rental contact's program registration.

Configuration settings
Go to Reg Settings > Rentals.
Rentals inquiry form links
Buttons appear at the top of this page:
- Copy Link to Initial Inquiry Form - copies the URL to your initial inquiry form to the clipboard. Use this link if you wish to configure a button on your website that directs prospective renters to your initial inquiry form.
- View Initial Rental Inquiry Form - opens a new tab to display your initial inquiry form. If you (manually) make entries on this page and click Submit Inquiry, Retreat Guru will create a new rental in Rentals v2 with the status of Lead.
- View Secondary Form - opens a new tab to display your inquiry form, showing your initial inquiry form questions and secondary form questions. If you (manually) make entries on this page and click Submit Inquiry, Retreat Guru will create a new rental in Rentals v2 with the status of Lead.
Inquiry form title and intro text
Provide the text you wish to appear at the top of the rental inquiry form by entering content in the Form title and Intro text boxes.

This text will appear at the top of the rental inquiry form.
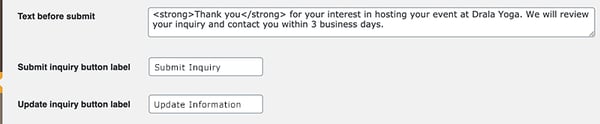
Submit and update buttons
Provide the text that you wish to appear just before the Submit (or Update) button on the rental inquiry form. The Submit button appears on the initial inquiry form and the Update button appears on the secondary form.
You may also customize the text that appears on the buttons.
This text will appear at the bottom of the rental inquiry form as shown in the sample below.

Page footer
The page footer appears below the Submit (or Update) button at the bottom of the rental inquiry form.

This text will appear as shown in the sample below.

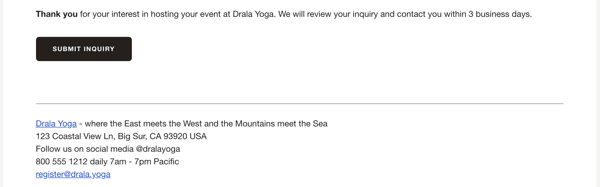
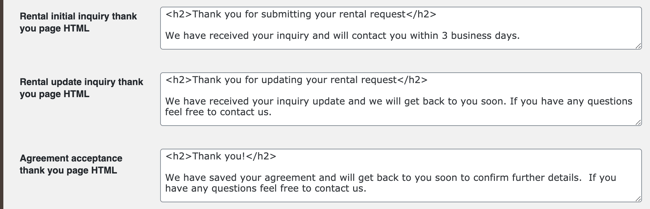
Thank you pages
Provide the text that you wish to appear on the thank you pages associated with Rentals v2. As the titles of these text customizations imply, you may include basic HTML in the content boxes.
- Rental initial inquiry thank you page HTML - displayed after the prospective renter clicks Submit on the initial rental inquiry form.
- Rental update inquiry thank you page HTML - displayed after the prospective renter clicks Update on the secondary rental inquiry form.
- Agreement acceptance thank you page HTML - displayed after the renter clicks on I Agree when viewing the rental Quote/Agreement and provides a deposit (if applicable).
The sample below shows the thank you page that appears when the secondary rental inquiry form has been submitted. Note that the Page Footer (described above) also appears on this thank you page.

Rental email notifications
See the section above titled Automatic email notifications.
Rental status
You may set the status of a rental at Rentals v2 > (choose a rental) in the upper left-hand corner of the view.
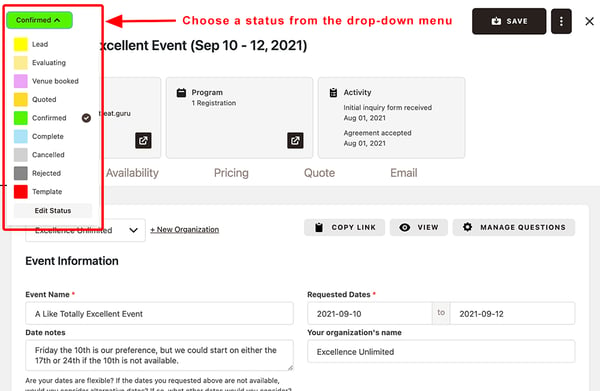
Configure the statuses at Reg Settings > Rentals > Rental Status.
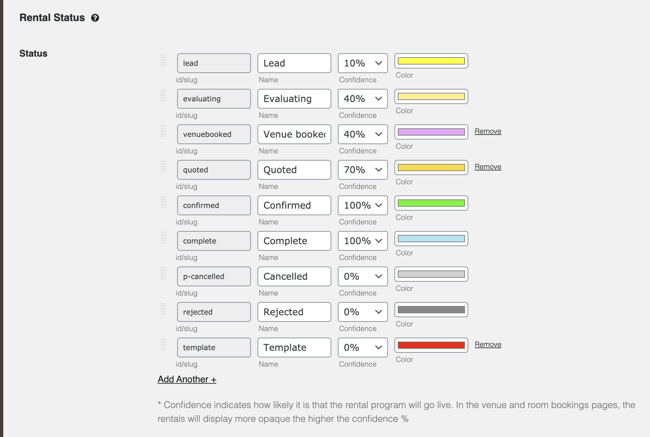
Confidence indicates how likely it is that the rental agreement will be accepted and the rental event confirmed. In the venue and room bookings pages, the rentals will display more opaque the higher the confidence %.
The statuses configured in this section apply to Rentals v2 only. You may configure statuses for programs at Reg Settings > Program > Program Status.
![]() We love rentals! If you have any questions, comments, or suggestions for improvement, please contact your friendly support guru.
We love rentals! If you have any questions, comments, or suggestions for improvement, please contact your friendly support guru.