Updated April 19, 2026
Here are some highlights:
🌟 Fields – in many contexts, these were previously called questions. For example, the First Name, Last Name, and Email fields appear on the registration form. The word question technically refers to the prompt component of a field that encourages a response from your guest. However, we sometimes say "question" when referring to a guest-facing field to distinguish it from an admin-only field.
🌟 Auto-sync – you can configure a set of fields as a globally accessible form and associate that form with multiple programs. Change the global form, and all programs using that form automatically update.
🌟 Flexibility – multi-person, quick-add, and required fields are configured on the form, rather than on the question. Additionally, on the form, rather than on the field, you can determine which primary form fields also appear on the secondary form.
🌟 Organize – view your list of forms from the main navigation menu and adjust your view via search, sort, and filters.
🌟 Choose defaults – create multiple Registration forms and choose the one you want to be the default when a new program is created. You can also create multiple Remote Registration and Waitlist forms and choose a default. There is one Rental Inquiry form, the default.
🌟 Add sections – group your custom fields to promote a logical flow.
🌟 Field sets – better organize the admin-only fields that appear on internal-only views. Field sets are displayed on the edit registration, edit person, and edit rental pages, which are accessible to your admin users.
🌟 Archive – hide unused forms to keep your forms list and drop-down selectors more compact by showing only active forms.
Contents
Definitions
Details for each are provided later in this article.
Field – used to collect information from your guests and prospective renters. A field has multiple components. Fields usually include a question and store a response or value. A field can appear in one or more forms. Fields can be used to filter and display views and reports. For example, you could configure a Lead Source field.
Question – a component of a field; a prompt that encourages a response during program registrations, rental inquiries, and other guest-facing workflows.
For example, you could add the question (prompt) for the lead source field as, “How did you hear about us?”
The choice of responses, referred to as input options, might be:
- Internet search
- Friend or family
- Social media
When a guest views the registration page for a program and responds to the question “How did you hear about us?” by selecting Friend or family, their response populates the Lead Source field.
Form – a collection of fields organized for a specific external or public view. displayed to participants, renters, and others.
You can build a form for use on a:
- Registration page to capture information about new bookings.
- Remote registration page, where group leaders can make room assignments.
- Waitlist page for use when a program has reached capacity.
- Rental inquiry page to gather details from prospective group bookings.
This article assumes that the Expandable registration form option is enabled, which includes a default Welcome section at the top and displays as a collapsible-style form on the registration page. Not sure if this applies to you? Contact your friendly support guru for assistance.
Legacy form – a special form that was automatically created for a pre-existing program. This only applies to centers that were operational before the Forms feature was enabled. These special forms allow the original registration questions to be retained. A legacy form can only be used by its original program. To make it available for other programs, you can activate it.
Field sets – used to organize fields displayed on internal-only views. In contrast to fields, which are guest-facing, field sets are admin-only, visible to your team members (admin users). Field sets are configured in Settings > Field Sets. Example field sets:
- Registration field set – appears on the edit registration page.
- Rental field set – appears on the edit rental page.
- Person field set – currently appears in the Person Fields section of the Edit Registration page. In a planned future release, this field set will appear on the edit person page.
The structure
Here’s the structure using the sample: How did you hear about us:
- Page: Registration page.
- Form: Registration form.
- Field: Lead source.
- Input type: Radio buttons.
- Input options:
- Internet search.
- Friend or family.
- Social media.
- Question
- Prompt: How did you hear about us?
- Field: Lead source.
- Form: Registration form.
-
-
-
-
- Help text: Please tell us how you first became aware of our center.
- Response: Friend or family.
-
-
-
List of forms
To view your list of forms, select Forms from the main navigation menu.

To adjust your view:
- Search the list by typing a keyword in the Search box.
- Sort the view by any column header that displays up/down arrows.
- Select an option from the View drop-down menu to focus results, for example, to view only Archived Forms.
- Choose + Filters to focus the display on forms with specific characteristics, like Registration or Archived.
- Choose Save options to create a new view.
- Set the Rows per page. Lower numbers will result in a faster page load time, while greater numbers will reduce the need to advance page by page.
Click x Programs for a Programs view filtered to show programs using this form.

Migrating to the Forms feature
The "migration" is only applicable to centers that were using Retreat Guru software before the Forms feature was released. In general, centers with a software go-live date after October 2025 are not affected.
Programs created before the release of the Forms feature retain their original registration questions. No changes were made to the questions selected on the registration forms for those pre-existing programs.
When the Forms feature was released, a special legacy form was automatically created to hold the questions selected on the registration form for the pre-existing program. You can continue to use that legacy form for that program and make edits if needed.
For example, at the fictitious Drala Yoga center, the All Adventures Getaway program was in place before the release of the Forms feature. On the Edit Program > Registration tab, their registrar had selected the questions that appeared on the registration form for that program.
When the Forms feature was released, the questions they previously selected were used to automatically create a legacy form called Reg Legacy - All Adventures Getaway (form #28). Retreat Guru uses the program name and attaches the prefix “Reg Legacy” to indicate that it existed before the release of the Forms feature.

A legacy form is associated with a single program. It can continue to be used and modified for that program, but it is not available for use by other programs.
To modify the questions on a legacy form, click View Form. Any changes to the legacy form will only affect the single program.

Activate a legacy form
If you’d like to reuse this legacy form for other programs, you can activate it. Activating a legacy form will make it available in your forms list.
To activate a legacy form, click on View Form, and select Activate in the Actions drop-down menu.

Once activated, the form will appear in the list of forms. The “Reg Legacy” prefix still appears, but you can rename this form if desired. This form is now available for use in other programs.

The connections column indicates that our Reg Legacy - All Adventures Getaway form is used by one program. Click on x Programs to view a filtered Programs list.
Create a new form
Best practice is to configure a minimal number of forms for use in programs, rentals, and other workflows to avoid repetitive manual updates.
Build a form once, and use it multiple times!
You can create a form by duplicating an existing form or creating a new one from scratch.
Duplicate a form
To duplicate a form, click on an existing form name in the list and choose Duplicate from the Actions drop-down menu.

This action creates a copy of the original form.
You can rename the copy and add/remove questions and sections as needed.
Initially, this form will not be associated with any programs. You can either make this new form a new default form or enable it for one or more programs individually.
Add a new form
To create a new form from scratch, click Add New from the Forms list page.
Use the Choose form type drop-down menu to choose the type of form you wish to create.

Only Registration, Remote Registration, and Waitlist appear in the drop-down menu, as they are the only form types that support multiple forms. All other form types include a single (default) form.
The Quick Add, Multi-person, and Secondary are not separate forms, but rather subsets of the Registration form. More information about these subsets can be found in the "Add questions” section later in this article.
For example, the registrar at the fictitious Drala Yoga center creates a registration form for their Yoga Teacher Training program, and names the form Registration - YTT.
When they click Save, a new form is created. It automatically includes the default (and required) Welcome section, which in turn, automatically includes three default (and required) questions: First Name, Last Name, and Email.

No other questions may be added to the Welcome section.
However, if the Validate guest emails feature is enabled, the second input box will appear in the Welcome section. You can enable the validate guest emails feature at Settings > Registrations > General.
If the Expandable registration form option is not enabled, the Confirm email box will appear immediately below the Email input box in the participant information section.
Add fields to a form
We'll cover creating and editing Fields later in this article. For now, we'll assume that an inventory of fields (questions) already exists.
By default, when the Registration - YTT form was created, it opened to the Primary tab.
The Primary tab
The Primary tab is where you can add fields that will appear on the primary registration form. As an option, the registration form can also be configured with a secondary form. We'll talk more about that later.
Click + Add questions and choose from your pre-existing inventory to add guest-facing fields on the Primary tab of the Registration - YTT form.
At our sample center, a registrar might add Mobile phone, Address, Email newsletter, Gender identification, and Self describe.

The + Add questions allows you to select from existing fields in your inventory. If you need to add a new field that is not currently in your inventory, you’ll need to first create it at Fields > Add New.
You may notice that ⓘ appears on certain Fields.

The ⓘ appears next to fields that use the radio buttons or drop-down input types. Hover over the ⓘ to see a list of the input options configured for the field.
With the newly added fields, the form now appears as follows.

The newly added fields were placed in the default Participant Info section.
You can apply a Text Customization to change the section title. However, only the default Participant Info title will show when an admin user views a form.
Note that we marked the primary tab fields Mobile phone and Address to also appear on the secondary form. If you mark a field on the primary form in this manner, it will show on the Primary (initial) form and in the top section of the Secondary form.
The Secondary tab
To add fields to the secondary form, open the Secondary tab, click + Add questions, and choose from your pre-existing inventory to add fields to the Secondary tab of the Registration - YTT form.

Indicators and options
Continuing with the sample form for registrations, let’s examine some of the indicators and options available when viewing a form.
The red * on a question indicates that it is required. The guest must answer this question before submitting the registration page.
Grab the hamburger icon to drag-and-drop fields to rearrange their order on the form.
Icons indicate if the field also appears on the Multi-Reg or Quick Add Reg forms.
If a field is marked as conditional, it will only display on the registration form when a specific response is provided to its trigger (parent) field. We’ll discuss conditional fields later in this article.

Click the kebab (three vertical dots) to view options.
The list of options will change based on the current state of the field on the form.
Here are some examples.
If the field is already marked as Required, the pop-up menu will display Not Required as an option (instead of Required).
If a field is already marked Include on Secondary, the pop-up menu will display Remove from Secondary.
- Required - require a response to the field before submitting the form.
- Include on multi-person reg - when that feature is enabled on a program.
- Include on Quick Add Reg - so your registrar can easily add a response.
- Include on Secondary Form - it will show this field on the initial form and in the top section of the Secondary form.
- Add conditional questions - use this field (question) as a trigger. When a specific response is given, other fields will be displayed. Those “other fields” will be marked is conditional on the form.
- Edit trigger question - shows on conditional fields, allows you to make changes to the trigger question.
- Edit Question - opens Questions > Edit Question, allowing you to modify the field configuration. Changes made to a field (question) are global. They affect every form where that field has been selected.
- Remove - it does not remove the field from your question inventory; it just removes the field from this form.
As we mentioned earlier in this article, the Quick Add, Multi-person, and Secondary form features are not separate forms, but rather subsets of the Registration form. When you add a field to a form, you can choose to have that field also appear in the related subset: multi-reg, quick add reg, or secondary.
Add a custom section
When you click + Add section, a new section will appear at the bottom of your form.

For example, if you add a section titled “The fine print” and add a description, the title and description will appear on the Registration page when viewed by the guest.

Next, you can drag and drop fields already on your form into the new section. You could also add new fields to this section.
Here’s what your sample form looks like after you moved fields into the new section.

You can remove the section header if you wish by clicking Ⓧ. This will remove the section header, but will not remove fields that were in that section. Fields that were in the section will be automatically relocated to the section directly above.
You may drag and drop a section to relocate it on the form. When you relocate a section, all fields within that section are moved with it.

Types of forms
Registration forms
The most common use of a Registration form is to collect information needed to complete a booking or sale. For example, to allow a participant to register for a retreat or program.
You can create multiple Registration forms and choose one to be the default. The default will be used for all new programs.
The Registration form includes a primary form and an optional secondary form.
In the previous sections of this article, a sample Registration form was used to show how to create a form, add questions, make fields conditional, add sections, and manage forms. Let’s continue with that example.
To specify which registration form a program will use, go to Programs > (choose a program to edit) > Registration > Registration Questions > Registration form.
For example, choose Registration - guest leader from the drop-down menu.

With that form selected for the program, the registration page will appear as follows.

Remote registration forms
The Remote Registration form enables teachers or group leaders to initiate the registration process for their participants and assign rooms. Read more about Remote Registration.
You can create multiple Remote Registration forms and choose one to be the default.
The remote registration form includes a primary form only. There is no secondary remote registration form option for the group leader. However, you (as the registrar) can enable the option to auto-send the Multi-Person Notification email to the newly added participant to collect additional details.
Here’s a sample remote registration form:

You can choose this Remote Registration form for use by one or more programs.
For example, go to Programs > (choose program to edit) > Advanced > Remote Registration for Group Leader. Choose Remote Registration - default from the drop-down.

Here’s the remote registration page pop-up as viewed by the group leader:

Waitlist form
The Waitlist form can be used to collect information from aspiring participants after the program has reached its maximum capacity. It helps you capture a list of prospects in case a space becomes available in a previously “full” program.
You can create multiple Waitlist forms and choose one to be the default.
The waitlist form includes a primary form only. There is no secondary form option.
Here’s a sample waitlist form:

The waitlist can be enabled on a program-by-program basis.
Read more about how to Manage a Waitlist.
To enable, go to Programs > (choose program to edit) > Registration > Capacity & waitlist. Check the box to Enable a waitlist.
Choose the waitlist form you would like to use for this program. In this example, the Waitlist - default form is selected.

When the program reaches its maximum capacity, the waitlist form will automatically be displayed instead of the registration page. Here’s an example:

Rental inquiry form
The Rental Inquiry form allows prospective clients to express their interest in hosting their group or conference at your site.
There is only one Rental Inquiry form, the default.
The Rental Inquiry includes a primary form and an optional secondary form.
Here’s a sample rental inquiry form:

For this sample, the rental inquiry will appear as follows.

Read more about Rentals for Groups and Conferences.
Default forms and field sets
The default forms and field sets are used when a new program or rental is created. We'll discuss Field Sets later in this article.
Only one default can be designated in each system area (registration, remote-registration, waitlist, and rental-inquiry).
- You can create multiple registration forms and choose one to be the default.
- You can create multiple remote registration forms and choose one to be the default.
- You can create multiple waitlist forms and choose one to be the default.
- There is only one rental inquiry form, the default.
- There is only one person admin field set, the default.
- There is only one registration admin field set, the default.
- There is only one rental admin field set, the default.
Default forms are identified in the "Default" column of the Forms list view.

To change the default in a system area to another form, select the form you’d like to be the new default, and choose Set as default in the Actions drop-down menu.

You can not choose a form that has been archived to become the default. You must unarchive the form first. More information on archiving is provided in the next section.
Archive a form
When a form is archived, it no longer appears in a program’s registration form drop-down menu. It can not be selected for a program. However, existing programs that utilize the archived form can continue to do so.
Archived forms do not appear in the default list view of forms. To view archived forms, choose Archived Forms from the View menu on the Forms list page.

A default form can not be archived. You must make another form in the same system area the new default before archiving the old form.
You can unarchive an archived form. Filter the forms list to view Archived Forms.
Choose the archived form that you wish to unarchive. Select Unarchive from the Actions drop-down menu.
Fields (Questions)
Fields are guest-facing and typically include a question (prompt) that directs guests to respond during program registrations, rental inquiries, and other workflows.
We discuss admin-only fields in the Field Sets section later in this article.
Create/edit by selecting Fields in the main navigation.
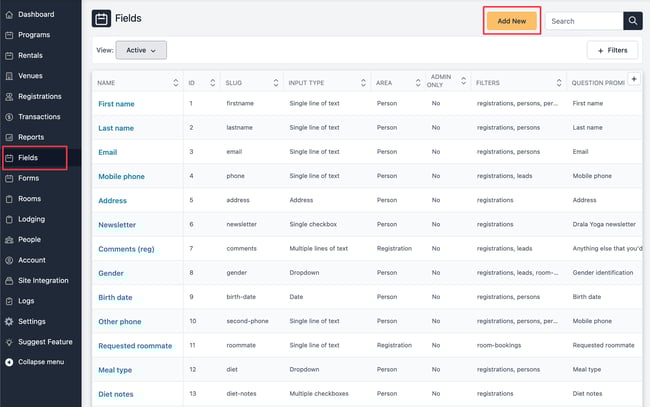
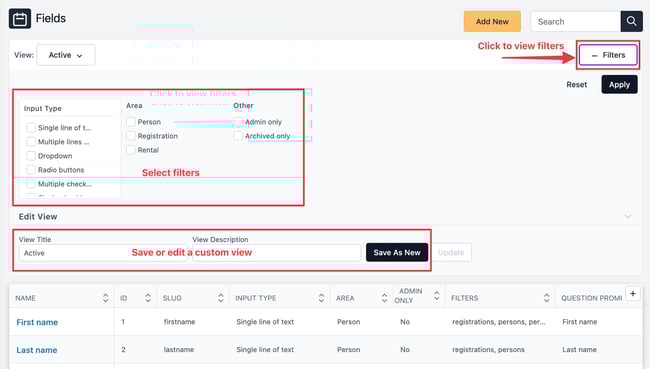
On the fields list page, you can create/edit custom views and filter the results.
Create a field
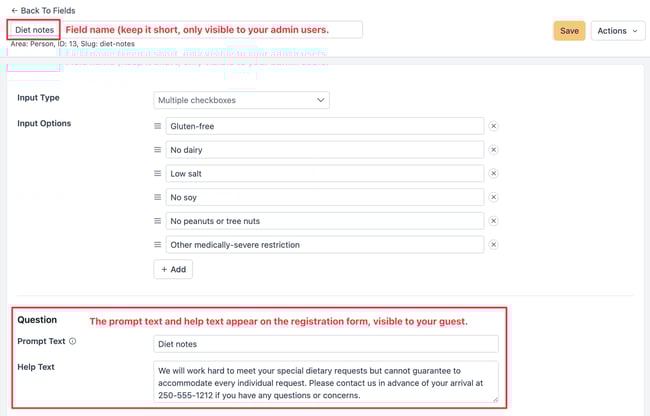
At our sample center, the registrar clicked Add New on the Forms list and created the Diet Notes field to capture special dietary requests, such as gluten-free, no dairy, no nuts, and other medically severe restrictions.
Area
When creating a field, you specify an Area. The field area designates how the field will be used.
- A person area field will always show the response that a registrant provided on their most recent registration form. It’s information that will likely remain the same for the person (name, email, address, diet, etc.) This information will appear in the Person Fields section of the Edit Registration page.
- Responses to a registration area field will likely be different for each registration (arrival time, how did you hear about us, etc.) This information will appear in the Registration Fields section of the Edit Registration page.
- Rental area fields appear on the rental inquiry form and the Details tab of the Edit Rental page.
Field name
Best practice is to keep the field name as short as possible. The field name is used to create the internal name (slug) of the field and the header that will appear in exports.
Input type
When creating a field, you choose an Input Type. Depending on your selection of Input Type, different Input Options will be displayed.
- The Multiple Checkboxes question type allows you to configure a variety of options for guests to choose from, and they can select as many as they wish.
- Input types like Radio Buttons and Drop-down also allow you to configure multiple options for guests to choose from, but a guest may choose only one of the available options.
- The Message (HTML) input type creates a read-only question type that conveys information to the person completing the form. Enter the information you wish to display in the Input Options box. You may include basic HTML formatting.
In our example, the registrar chose Multiple Checkboxes as the Input Type.
Their field looks like this:
Question
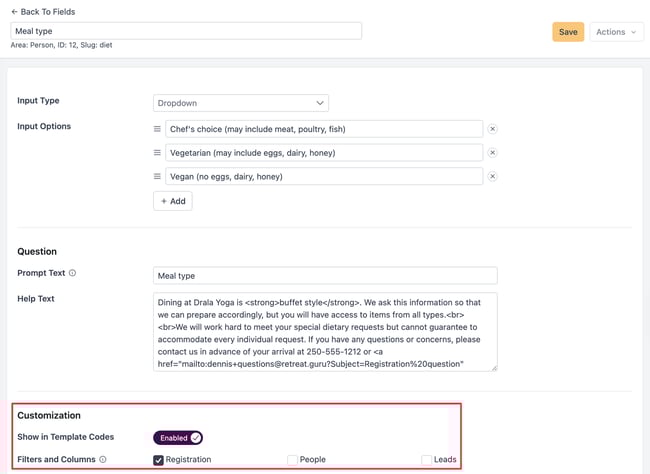
The question component of a field is the prompt text visible to your guest on the registration form. You may include help text to appear on the form.
Field email template codes
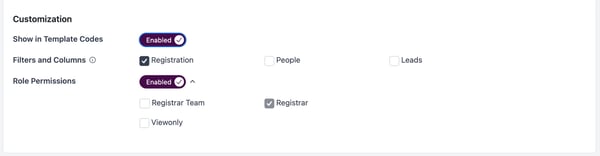
When creating a field, you can make the information available to include in an email by enabling Show in Template Codes.
Filters and columns
When creating a field, you can choose which lists you would like this field to appear in. If selected, the field will be available as a filter and Screen Option (column header) in the lists you specify.
Once you add a field to a form, you can make that field conditional and/or required. See the section below for more about conditional fields.
Having the configurations for conditional and required on the form, rather than on the field itself, allows for more flexibility. A field can be conditional or required on one form and not on another.
Role permissions
For each field, you can set role permissions to limit access to specific Team Member (admin user) roles. For example, you could limit access so that only team members in the Registrar role could see the field Birth Date and its response on the edit registration page.
Make a field conditional on a form
A conditional field is one that only appears on the form when a specific response is provided to another field on the form.
For example, if a guest responds to the question, “How did you hear about us?” by selecting “Other source”, you can display a follow-up question like “Tell us about that other source.”
If they had answered, “Google search”, the “Tell us about that other source” question would not have appeared.
Conditional fields are configured on the form.
The general approach:
- Create the fields at Fields > Add new.
- Add the fields to the form, both the trigger question and the conditional question(s).
- Configure the relationships. Set the conditions by designating the trigger question and the conditional question(s).
If a guest selects the Other medically-severe restriction input option, the center wants to display a follow-up question to collect details about the restriction. They want the follow-up question to be conditional - to appear only if a guest checks the box next to Other medically severe restriction on the Diet notes question.
Create the field
They created a follow-up field named Other diet restrictions, specified "Other medically-severe dietary restrictions" as prompt text, and added some help text.

Add the fields to the form
At the Drala Yoga sample center, the registrar would like to add these fields to the default registration form.
They go to Forms and select the one named Registration.
On that form, they click + Add questions, select Meal type, Diet notes, and Other diet restrictions fields, and click Add to form.
With these fields added, their form appears as follows.

When new fields are added, they appear at the bottom of the form. You can use the hamburger icon to reorder the fields if needed. In most cases, you will want the conditional (child) field to appear after the trigger (parent) field to support a logical flow.
Move the new fields into the Participant Info section, and the form will look like this. Notice that the registrar also made the Meal type field required.

Set the conditions on the form
Next, the registrar establishes the relationship between the Diet notes field and the Other diet restrictions field.
They click the kebab (three vertical dots) on the Diet notes row, and choose Add conditional questions.

A pop-up shows the trigger question (Diet notes) with option + Add condition.

They click + Add condition to set the condition.
They choose Other medically-severe restrictions as the response that triggers the conditional question. Select Other diet restrictions as the question that appears when triggered.
Finally, they click Done to save their configuration and close the pop-up.
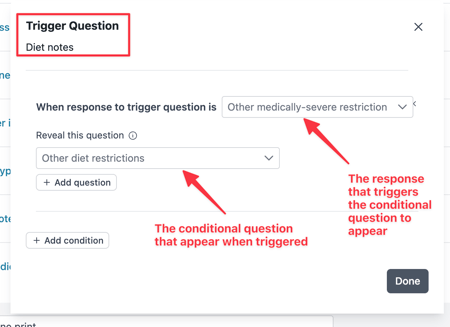
The Diet notes field now shows the has condition indicator, and the Other diet restrictions field shows the is conditional indicator.

To modify the relationship, click the kebab (three vertical dots) and choose Edit trigger question.

Click + Add question if you want to display additional conditional fields when the response to Diet notes is Other diet restrictions.

Click + Add condition if you want to show one or more conditional fields when the response to Diet notes is another value. For example, if the guest response is No peanuts or tree nuts, you may wish to show a message (question input type = Message HTML) that advises your facilities are not nut-free.

Here’s how the sample form will appear on the guest registration page, including the conditional fields. Since No peanuts or tree nuts and Other medically-severe restriction are both checked, both conditional fields appear.

Field sets
Field sets organize fields for internal-only views by your center's admin users. These typically include admin-only fields.
Field sets are configured in Settings > Field Sets.


Default field sets:
- Person field set - appears on the edit person page (future feature).
- Registration field set - appears on the edit registration page.
- Rental field set - appears on the rental page.
For example, the admin-only field HKP Notes is in the Registration admin field set and is used by the registrar to capture special requests for the housekeeping team.
This field is associated with a registration and appears on the edit registration page.
Since it’s admin-only, it does not appear on the registration page. It’s for internal use only.

There is only one person admin field set, the default. The field order in the field set determines how the fields are displayed on the edit person page.
There is only one registration admin field set, the default. The field order in the field set determines how the fields are displayed on the edit registration page.
There is only one rental admin field set, the default. The field order in the field set determines how the fields are displayed on the edit rental page.
![]() Congratulations, you are now in great form! If you have any questions, comments, or suggestions for improvement, please don't hesitate to contact your friendly support guru.
Congratulations, you are now in great form! If you have any questions, comments, or suggestions for improvement, please don't hesitate to contact your friendly support guru.