![retreat_guru_logo_1000px-2.png]](https://help.retreat.guru/hs-fs/hubfs/retreat_guru_logo_1000px-2.png?height=40&name=retreat_guru_logo_1000px-2.png)
Last Updated: September 2026
Overview
A program is anything a guest registers for: a retreat, a stay, a day event, an online course or a gift certificate. Each program has its own dates, prices, registration settings and emails.
You create and edit programs at Programs. The edit screen is split into tabs. You set the dates and the public description on the Information tab, the prices on the Pricing tab, and who can register on the Registration tab. The Email tab sets which emails go to your guests and when.
A new program is a draft until you publish it, so you can set it up fully before anyone sees it.
Highlights
- Program edit screen
- Information tab
- Pricing tab
- Registration tab
- Email tab
- Venues tab
- Advanced tab
- Marketplace tab
- Groups tab
- Check your program before you share it
- If your program does not show on your website
See also, Pricing Methods for Programs, Configure a Day Event, Forms and Fields and Emails.
Program edit screen
Create a new program
- Go to Programs.
- Click Add New at the top of the list.

The Add New Program screen opens on the Information tab. Enter a title, set the dates, then click Save Changes. The program saves as a draft.
To start from a program you already have, duplicate it instead. See Duplicate, cancel or restore a program.
Tabs and buttons

Which tabs you see depends on the features on your account. Some settings in this article are optional features, so your screen may not show every box. If you cannot see one, contact your friendly support guru.
| Tab | What you set there |
|---|---|
| Information | Dates, location, teachers, description, publish settings, status, categories, image and color |
| Pricing | How the program is priced, lodging, optional items, discounts, donations and deposits |
| Registration | The registration form, whether registration is open, payment, capacity and waitlist |
| The emails sent to guests for this program, and when | |
| Venues | Which venues the program uses. An optional feature |
| Advanced | Program notes, tasks, room blocks and the program code |
| Marketplace | How the program is listed on retreat.guru |
| Groups | Remote registration, the group leader and the BEO. An optional feature |
- Save Changes is at the right end of the tab row. One click saves every tab, so you can work across several tabs and save once.
- View Program opens the public program page. A draft shows Preview instead.
- Register as guest opens the registration form, and Quick add reg. adds a registration from the admin side. Both appear after the first save.
- Remote reg. appears on a Fixed Date, lodging based program if your account uses remote registration for groups. See Groups tab.
- Actions holds Duplicate and Cancel. See Duplicate, cancel or restore a program.
Title and permalink
The title shows on your website, the registration form, emails and the guest statement. Include what the program is and its length, for example 5 Day Hatha Yoga Retreat.
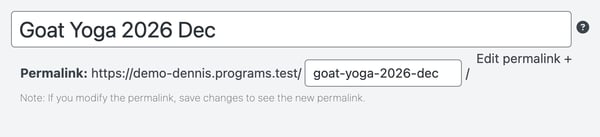
The permalink is the end of the program's web address. It is created from the title. After the first save, click Edit permalink + under the title to change it, then Save Changes.
- While the program is a draft, the permalink follows the title when you rename it, until you edit the permalink yourself. Once the program is published, it stays the same until you edit it.
- If you change the permalink of a published program, the old address redirects to the new one.
Program Actions
These are in the Actions menu beside the title.
- Duplicate makes a copy of the program. The copy is a draft named after the original with Copy on the end. It keeps the original's settings, including prices, teachers and forms. Change its dates, then check its List until date. Keep one program set up the way you like as a template, and duplicate it for each new run.
- Cancel cancels the program. Cancelling removes the program's room and venue blocks. It does not cancel its registrations, so cancel those yourself. A cancelled program can be viewed but not changed.
- Restore appears in the same menu on a cancelled program, and brings it back.
Information tab
Dates
The Program Type and Dates box sets how guests choose their dates. If your account uses Locations, the box is called Program Type, Dates and Location. Pick a type from the drop-down at the top of the box.
| Type | Use it for | What guests choose |
|---|---|---|
| Fixed Date | A retreat with set start and end dates | Nothing. The dates are fixed |
| Package | A stay of a set length, for example a 3-night package | The start date |
| Flexible Dates | A stay where the guest chooses the nights, as at a hotel | The start and end dates |
| Anytime | Something with no date, for example an online course, a coaching session or a gift certificate | Nothing |
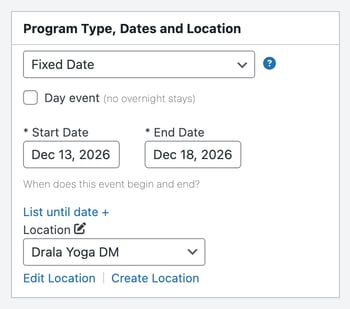
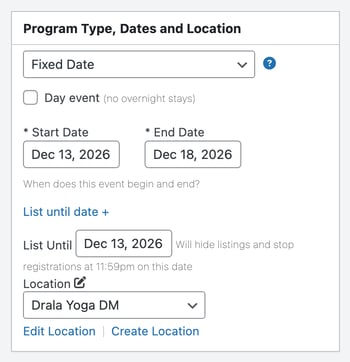
Fixed Date. Enter a Start Date and an End Date. Your website lists fixed date programs with the soonest start date first. The registration form has no dates step. The dates show beside the form.
Day event (no overnight stays). Tick this on a Fixed Date or Package program for an event that starts and ends on the same day. The End Date is hidden and set to the start date. A day event is priced with simple, multiple pricing only. See Configure a Day Event.
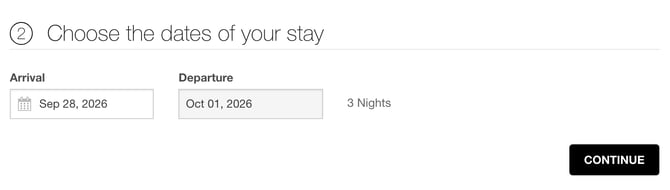
Package. Beside Package is, enter the number of nights the stay lasts. On the registration form, guests pick the Arrival date, and Departure fills in to match.
If your account has recurring packages, choose Flexible start date to let guests pick any start date, or Fixed start dates to offer a set list of dates. For fixed start dates, click Set recurring dates +, enter a start date, and click Add Another + for each extra date. This is an optional feature.
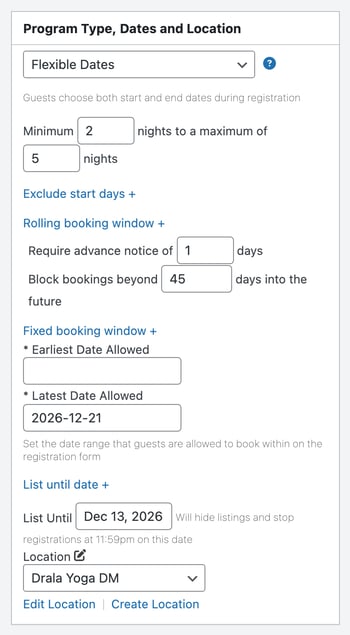
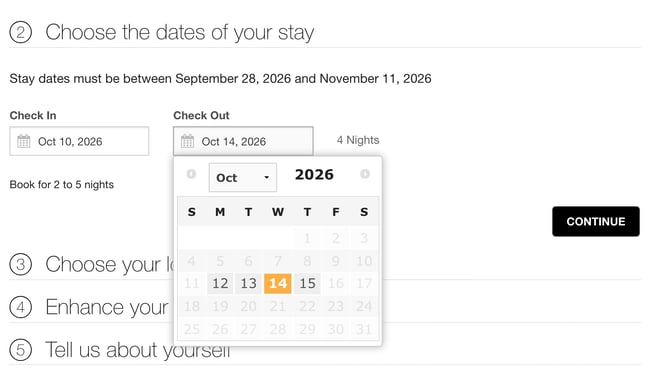
Flexible Dates. Guests pick Check In and Check Out dates on a calendar. Enter the Minimum and the maximum number of nights to set the shortest and longest stay a guest can book. Leave the maximum blank for no limit. If the minimum is more than the maximum, no dates are available.
On the registration form, the guest picks Check In first. Check Out then offers only the dates within the minimum and maximum stay.
These controls apply to Package and Flexible Dates programs:
- Exclude start days + lists the days of the week. Tick the days a guest cannot start a stay.
- Rolling booking window + sets how far ahead guests can book. Require advance notice of a set number of days stops last-minute bookings. Block bookings beyond a set number of days into the future stops bookings too far ahead. It starts at 365 days.
- Fixed booking window + sets an Earliest Date Allowed and a Latest Date Allowed. Guests can book only stays between those dates. This is an optional feature.
Anytime. There are no dates to set. The program stays available until its List until date, if you set one.
List until date
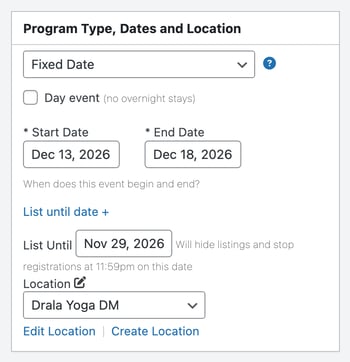
Click List until date + to see the List Until date. On that date, at 11:59 pm, the program is hidden from your listings and registration stops.
- On a Fixed Date program, List Until starts as the start date. Registration closes at the end of the first day unless you change it.
- On every other type, List Until starts as January 1, 2050, which in practice means the program never expires.
- After the date passes, someone with the direct link can still open the program page. There is no register button.
A worked example. Goat Yoga 2026 Dec runs from December 13 to December 18. Its List Until date is December 13, the start date, so guests can register until 11:59 pm on December 13. To close registration two weeks before the start, change List Until to November 29 and click Save Changes. If spaces are still available closer to the date, change List Until to December 12, the day before the start, and click Save Changes again.
Location
If your account uses Locations, the Program Type, Dates and Location box has a Location drop-down. Choose where the program takes place. A new program starts on No Location. Edit Location opens the chosen location, and Create Location adds a new one. You manage your locations at Configuration > Locations.
Under Program Information, Location display sets what the program page shows: Show location/display name and Show address.
If your account does not use Locations, type the Location and Address in the Program Information box instead.
Teachers
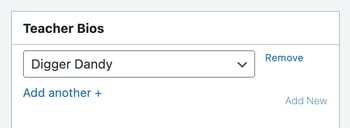
In the Teacher Bios box, choose a teacher from the drop-down. Click Add another + for each extra teacher, and Remove to take one off. Teachers are listed in the order you add them.
To add a teacher who is not in the list, click Add New. You manage your teachers at People > Teachers.
Description and program information
The description is the large editor below the dates. It is the main text of the program page. Use Add Media to add images. Switch between Visual and Code for plain HTML.
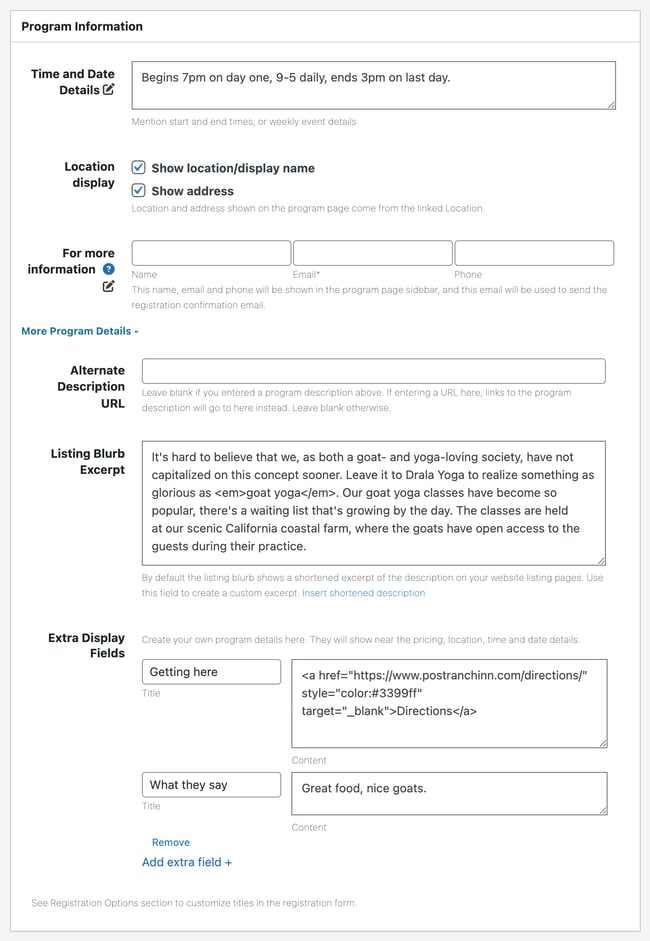
The Program Information box holds the smaller details shown on the program page:
- Time and Date Details - start and end times, or a daily schedule.
- For more information - a contact Name, Email and Phone, shown in the sidebar of the program page. Each time a guest registers, this address gets the Registration Notification (Admin) email, and your Registrar's Email gets a copy. After you enter an email, DO NOT notify Registrar appears. Tick it to send that email to this address only. Guest emails are never sent from this address. To have guests' replies come here, tick Set Reply-to to Program Contact at Settings > Email. It applies to every email guests get, and the contact Name shows as the sender name.
- More Program Details opens three more fields:
- Alternate Description URL - send links for the program description to a page on your own website instead.
- Listing Blurb Excerpt - the short text on your website's program listings. Leave it blank to use the start of the description. Insert shortened description copies the first 55 words in for you to edit.
- Extra Display Fields - your own Title and Content pairs, shown near the pricing, location, time and date details. Click Add extra field + for another pair.
Click the pencil beside a row's name, such as Time and Date Details, to change that heading on the program page.
Two more boxes sit at the bottom of the tab:
- Event Hosted Online - tick This Program is Online for a program that takes place online. See Configure an Event Hosted Online.
- SEO - a Page title and Meta description for search engines. See SEO - Search Engine Optimization.
Publish
The Publish box on the right sets whether the program is live, and where it is listed.
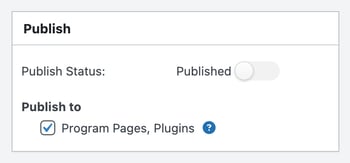
- Publish Status - switch Published on to make the program live, then click Save Changes. While it is off, the program is a draft. A draft is not listed anywhere, and its link does not work for guests.
- Publish to - where a published program is listed:
- Program Pages, Plugins - your program pages and your own website. A new program starts with this ticked. Untick it to keep a published program off your listings. Anyone you send the link to can still open it and register.
- Marketplace - appears if your account lists on the retreat.guru Marketplace. Tick it to list the program there. The program also needs a topic on the Marketplace tab. If Program not on Marketplace shows beside Save Changes, the program is not listed yet. See How to List on the retreat.guru Marketplace.
You can edit a program after it is published. Your changes go live when you click Save Changes.
To keep a program private, switch Published on and untick Program Pages, Plugins and Marketplace. The program is live but unlisted, so only people with the link can register.
Program status
The Status box sets where the program stands in your own planning. It is separate from publishing: a Confirmed program can still be a draft. A new program starts as Confirmed.
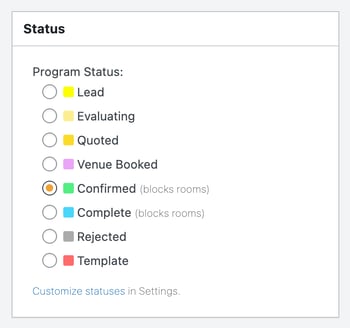
- Confirmed is built in. Any other status in the list, such as Quoted, is one your center has added.
- A status marked (blocks rooms) holds the program's room blocks. Other statuses do not.
- Customize statuses opens Settings > Programs, where you manage your statuses.
- To cancel a program, use Actions > Cancel, not a status. See Duplicate, cancel or restore a program.
Program categories
Categories group your programs. Your website can show one category at a time, and reports can filter by category.
In the Program Categories box, click Add, pick a category and click Apply. Click the X beside a category to remove it. Then click Save Changes.
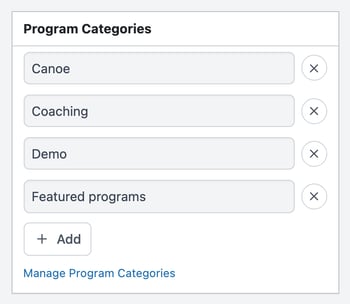
To create a category, click Manage Program Categories, or go to Configuration > Categories, and click Add New. The Used By column shows how many programs use each category.
Featured image
The featured image shows on the program page, in your website's program listings and on the registration form. It is also the image used when someone shares the program link.
Click Set featured image in the Featured image box, then pick an image from your media library or upload one. Click the image to change it, or Remove featured image to take it off.

Booking calendar color
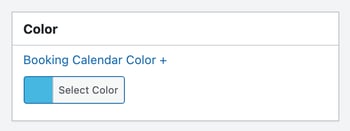
Click Booking Calendar Color + in the Color box and pick a color. The program shows in that color on Scheduling > Booking Calendar. Use colors to tell kinds of program apart, for example your own retreats in green and rentals in yellow.
Registrations, Rental Information, Participant Roster and Organization boxes
- Registrations - appears at the top of the sidebar once people register. It shows the registration count, bed nights and revenue, with a link to Send bulk email.
- Rental Information - appears on a program that belongs to a rental. See Rentals for Groups and Conferences.
These boxes appear only if your account has the feature:
- Participant Roster - links to the roster of who is attending.
- Organization - Connect Organization with this Program + links the program to an organization, such as a group that has booked with you.
Pricing tab
The Pricing tab sets what the program costs and how guests pay. Start with the Pricing Method. The rest of the tab changes to match it.
Pricing method
Choose a Pricing Method at the top of the Pricing Options box. The fields below it change to match.

- simple, multiple - one or more set prices for guests to choose from. A new program starts on this method. A day event can use only this method.
- lodging based - the price depends on the lodging type the guest picks. This is the only method that books a room, so use it for any program with overnight stays in your rooms. If you do not see it, rooms and lodging are switched off for your account. Contact support.
- free - no payment is taken. Tick Enable Payment to take payment for a donation on a free program.
- suggested donation - the guest pays any amount, with an optional suggested amount or range.
- sliding scale - the guest enters an amount within a range you set.
See Pricing Methods for Programs for each method in detail.
Changing a price does not change what existing registrations were charged. The new price applies to new registrations.
Prices on a simple, multiple program
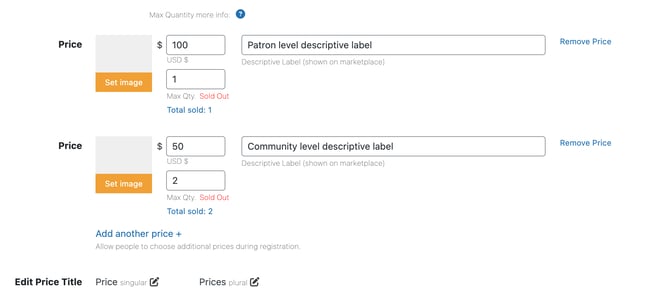
Each price has an amount and a Descriptive Label. Click Add another price + to offer another price, and Remove Price to take one off. Set image adds an image to a price. Under Edit Price Title, click the pencil beside Price or Prices to change the word guests see.
Max Qty. limits how many registrations one price can take:
- Leave it blank for no limit of its own. Only the program's capacity stops it.
- Enter 0 only to close the price. 0 means the price is always sold out.
- A price that reaches its limit shows Sold Out on the registration form, and guests cannot choose it. Total sold beside each price shows how many registrations it has. Each guest in a multi-person registration counts as one.
- The program's capacity still applies. When the program reaches its Max Person Capacity, no price can be booked, even one with Max Qty. left. On a day event, every price shows Sold Out. On other programs, the program is fully booked, and guests see the waitlist form if the waitlist is on.
- If every price has a limit, all of them are sold out and the waitlist is on, the registration link opens the waitlist form.
- Max Qty. appears on Fixed Date and Anytime programs and on day events. On a day event it is a daily limit, and Customize Daily Capacity changes it for one day.
On the registration form, a sold-out price is greyed out beside SOLD OUT.
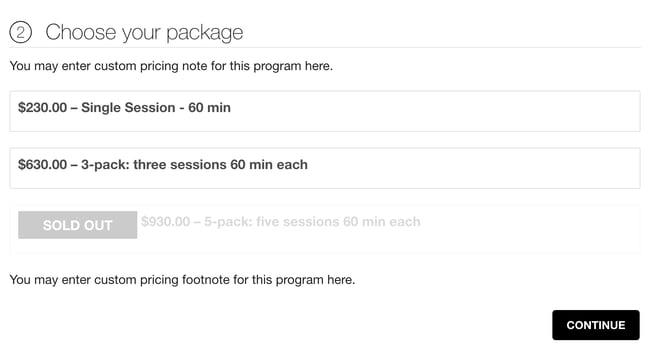
A worked example. A simple, multiple program has two prices. Patron level at $100.00 has a Max Qty. of 1 and one registration. Community level at $50.00 has a Max Qty. of 2 and two registrations. Both show Sold Out. Had Community level been left blank, it would still be on sale.
Package Builder
Package Builder adds set charges to every price, such as a registration fee or meals. It appears on simple, multiple and lodging based programs. Each row has an Amount, a Description, a Transaction category and a Frequency: 1x, multiple or Per night. Click Add Another + for another row. See Package Price Builder.
Lodging prices on a lodging based program
Tick each lodging type this program sells. Each row shows the Total price a guest pays: the Lodging part plus the Package Builder items. The line above the list shows the sum, for example Calculated for 5 nights plus $500.00 package cost.
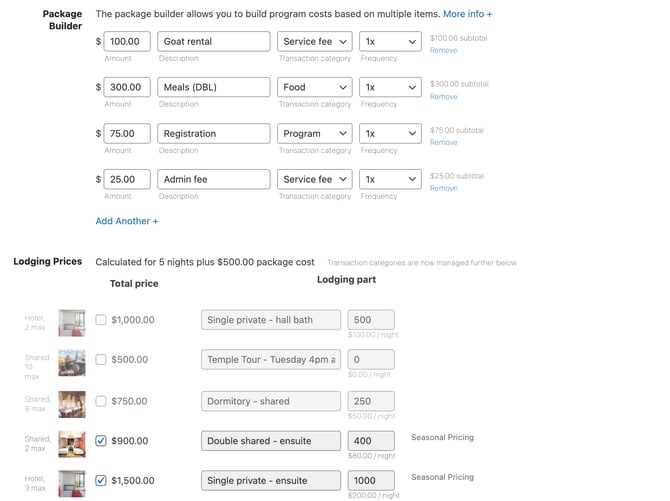
On Goat Yoga 2026 Dec, the four Package Builder rows add up to $500.00. Double shared - ensuite has a Lodging part of $400 for the 5 nights, so its Total price is $900.00.
To charge a different lodging price on this program, tick Modify on that row and enter the amount in Lodging part. On Fixed Date and Package programs, enter the price for the whole stay. On Flexible Dates programs, enter the nightly price.

- A lodging type with seasonal pricing shows Seasonal Pricing instead of Modify. Its prices come from the lodging type's seasons. If your account allows it, Modify also shows on a seasonal row, and a modified price replaces the seasonal price for this program.
- The lodging types themselves, with their usual prices, are set at Configuration > Lodging Types. See Rooms and Lodging.
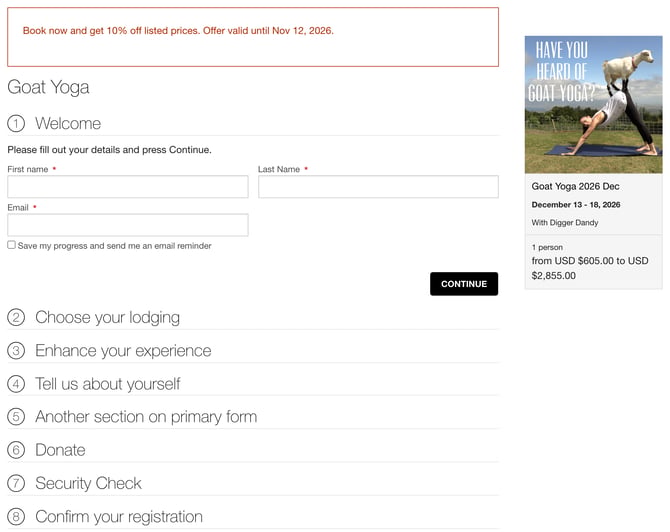
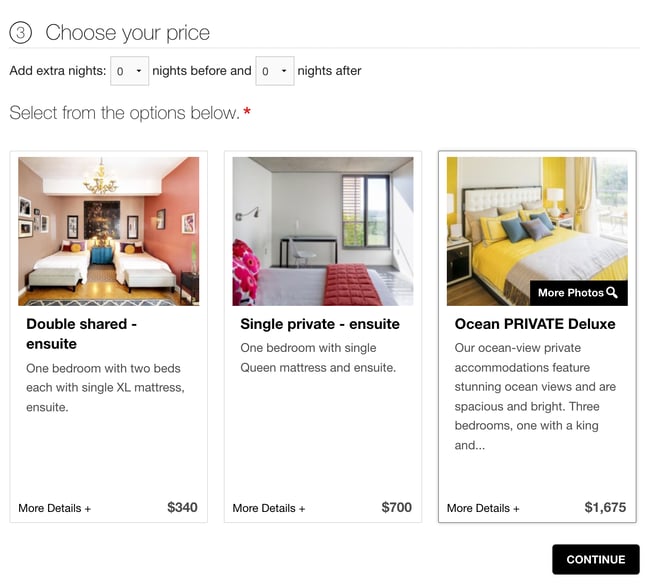
On the registration form, each lodging type is a card with its price, and the guest picks one.
If your account shows Additional cost for plant medicines & psychedelics below the lodging prices, see Medicine Not Included for Payment Processing.
Optional items
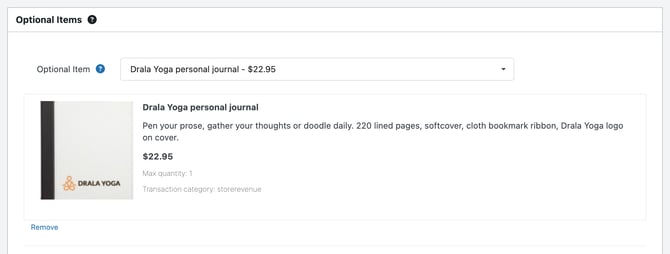
The Optional Items box offers extras a guest can choose, such as a book or a massage. Pick an item from the Optional Item drop-down, and click Add another + for more. You create the items themselves at Configuration > Optional Items. Once created, an item can be added to any program.
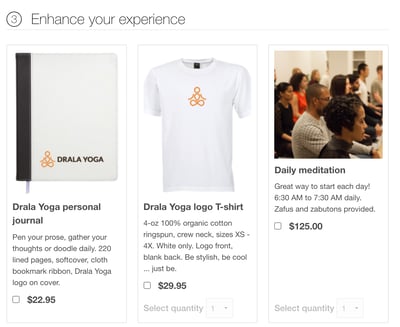
On the registration form, optional items have their own step. Each item has a tick box and its price.
Early bird discounts
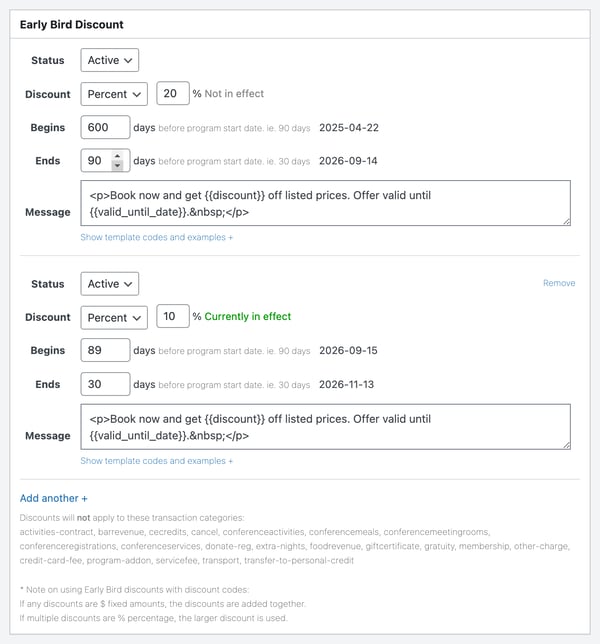
The Early Bird Discount box takes money off for guests who register early. It works on Fixed Date programs only.
- Set Status to Active.
- Choose Percent or Amount under Discount, and enter the discount.
- Begins and Ends are days before the program start date. For example, Begins 90 and Ends 30 runs the discount from 90 days before the start until 30 days before.
- Message is the text guests see on the registration form while the discount is on. Click Show template codes and examples + for codes such as
. - Currently in effect shows beside a discount that is running today.
- Click Add another + to add a second discount window.
If a guest has an early bird discount and a discount code, fixed amounts are added together. Where both are percentages, the larger one is used.
For a multi-person registration, Settings > Pricing > Early bird pricing sets which guests get a fixed early bird amount. Limit to one gives it to the first guest, and Per Guest gives it to each guest. Legacy (mixed), the default, gives it to each guest, except guests sharing a room priced per room, who get one per room. A percentage early bird applies to every guest whatever the setting. If you do not see the Early Bird Discount box on a program, switch on Early bird pricing on the same page.
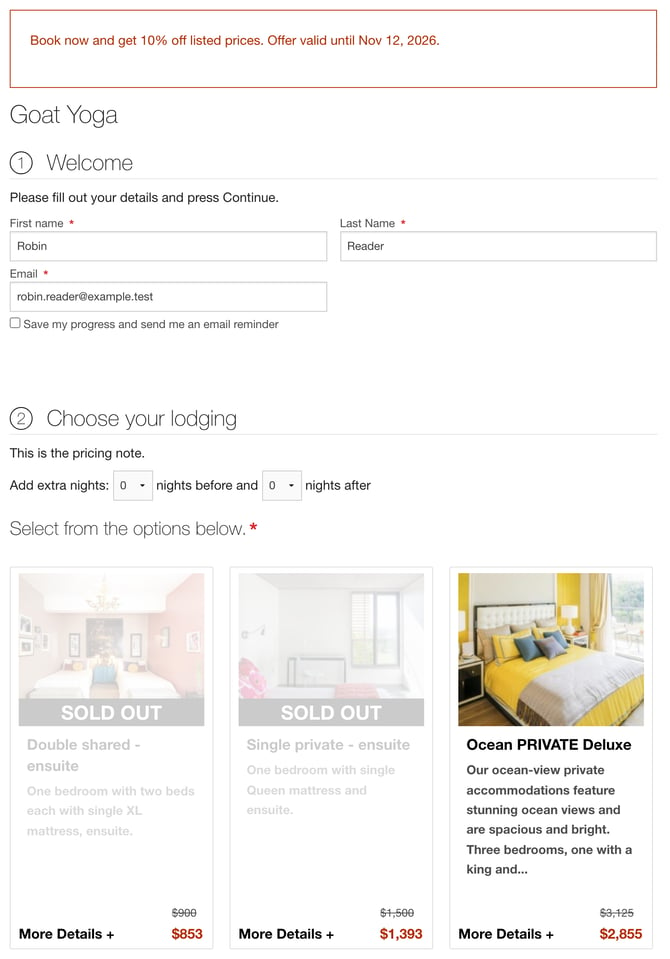
On the registration form, the Message shows at the top, and each price shows struck through beside the discounted price. If your account uses Discount Exclusions at Settings > Pricing, a percentage early bird does not discount the transaction categories listed there.
Discount codes
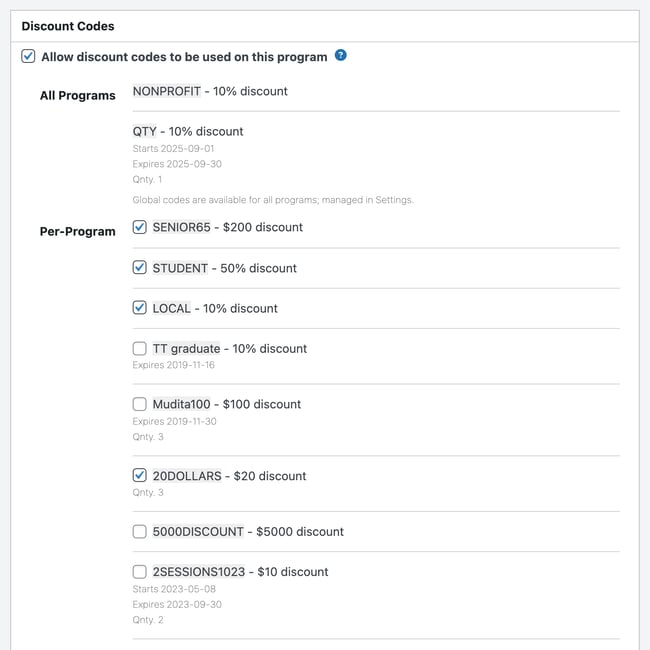
Tick Allow discount codes to be used on this program in the Discount Codes box. Guests can then enter a code on the registration form. A new program starts with this unticked.
- Codes under All Programs work on every program once the box is ticked.
- If your account has per-program codes, tick each code under Per-Program that this program accepts.
You create codes at Settings > Pricing. See Discounts.
Donation options
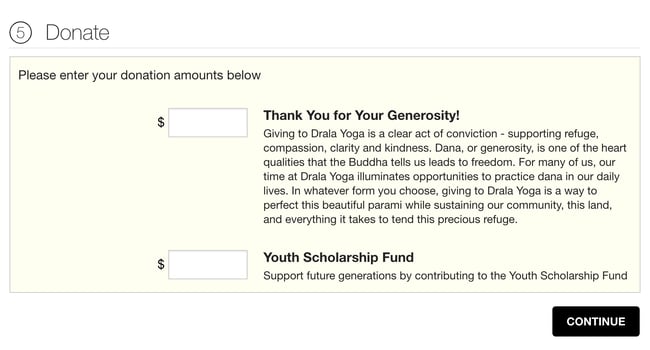
The Donation Options box adds a donation to the registration form. Guests can enter any amount. Enter a Donation Title for each campaign, and click Add another donation item + for more. Tick Hide the donation form for this program to turn donations off.
On the registration form, each campaign has its own amount box.
A new program starts with the donation items from your settings. This is an optional feature. See Donations.
Deposit
The Deposit box sets whether guests pay in full or pay a deposit first.
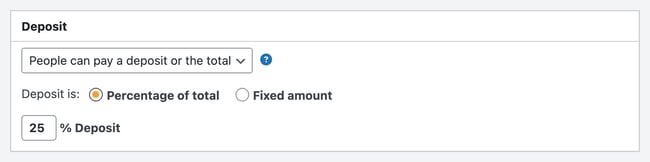
- Choose People pay the total only, People can pay a deposit or the total or People pay a deposit only.
- For a deposit, choose Percentage of total or Fixed amount, and enter the amount.
- One setting stops deposits close to arrival, on all programs. At Settings > Finance, in the Deposit default box, enter a number of days in Disable deposits. Deposits stop that many days before the program starts. On a Package or Flexible Dates program, the days count back from the guest's arrival. After that, guests pay the full amount, even on a program set to People pay a deposit only. It starts at 10 days. Leave it blank or enter 0 to keep deposits open. A program cannot change it.
Installment payments
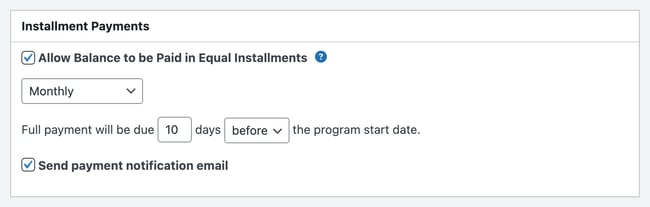
The Installment Payments box lets guests pay the balance in equal parts after their deposit.
- Tick Allow Balance to be Paid in Equal Installments.
- Choose Every two weeks, Monthly or Quarterly.
- Beside Full payment will be due, enter a number of days and choose before or after the program start date.
With installments on, a guest who pays a deposit by card also gets the installment plan. What the guest can choose depends on the Deposit box:
- People can pay a deposit or the total - under Pay, the guest chooses Full amount or Deposit with installment payments.
- People pay a deposit only - every guest pays the deposit and then the installments.
- People pay the total only - no plan is made.
Once the Full payment will be due date has passed, Deposit is a plain deposit and no plan is made.
A plan is created only when a guest pays a deposit by card, so the Deposit box must allow a deposit. This is an optional feature. See Installment and Scheduled Payments.
Transaction categories
The Transaction Categories box changes the transaction category of the Program, Lodging, Extra Nights and Discount charges for this program only. Taxes follow the transaction category, so this is how one program gets different tax from the rest. Click Modify + to see the four rows. Leave them blank unless you need them.
Registration tab
Registration form
The Registration Questions box has one setting, Registration Form. Choose the form guests fill in when they register for this program. Click view form to open that form and change its questions.
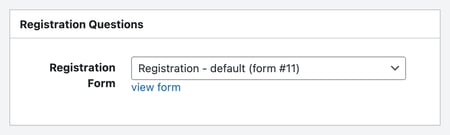
You build forms at Forms > Forms, and manage the questions themselves at Forms > Fields. Whether a question is required is set on the form, not on the program. See Forms and Fields.
Registration options
The Registration Options box sets whether guests can register online.
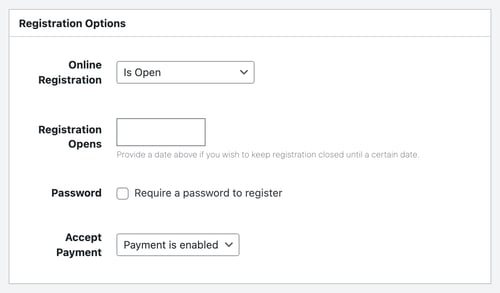
Online Registration has four choices:
- Is Open - guests register on your registration form.
- Is Not Required/Closed - there is no register button. Type a Registration Note to show in its place.
- Is at another website - the register button goes to the Website URL you enter.
- Waitlist Only - every guest is sent to the waitlist form. The waitlist is switched on for you.
With Is Open selected, you also see:
- Registration Opens - a date before which registration stays closed. Leave it blank to open registration as soon as the program is published.
- Password - tick Require a password to register to make guests enter a password first. This is an optional feature.
Accept payment
Accept Payment is in the Registration Options box, under Is Open. Payment is enabled takes payment on the registration form. Payment is disabled takes the registration with no payment. The row is hidden when the program's pricing method is free.
Capacity and waitlist
The Capacity & Waitlist box limits how many people can register.
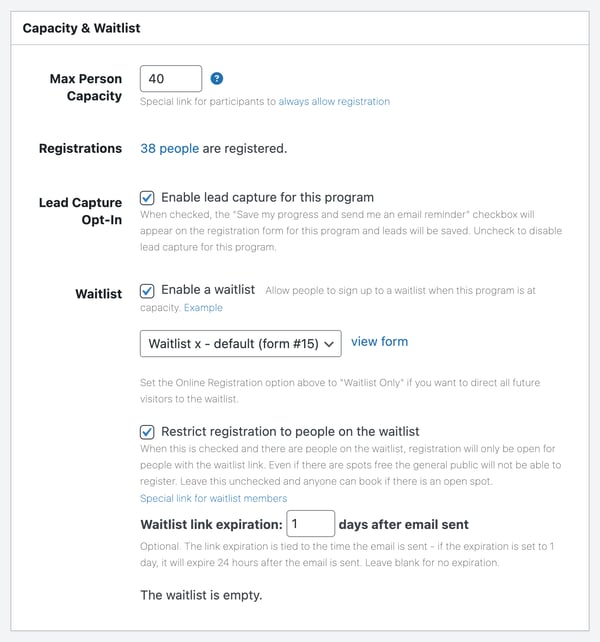
- Max Person Capacity - the most people who can register. Leave it blank for no limit. Enter 0 to take no more registrations.
- always allow registration - the link under Max Person Capacity. It lets someone register when the public cannot, for example when the program is full or past its List Until date. The link is the same for everyone, so anyone you send it to can use it.
- Enable a waitlist - when the program is full, guests are offered the waitlist form instead. Choose which waitlist form under the checkbox.
- Restrict registration to people on the waitlist - while anyone is on the waitlist, only people with the waitlist link can register, even when places are free. Special link for waitlist members is that link. Waitlist link expiration sets how many days after the email the link stops working. Leave it blank for no expiry.
See Manage a Waitlist for the rest of the waitlist.
If your account uses lead capture, Enable lead capture for this program shows the Save my progress and send me an email reminder option on the registration form.
Advanced options
The Advanced Options box holds the less common registration settings.
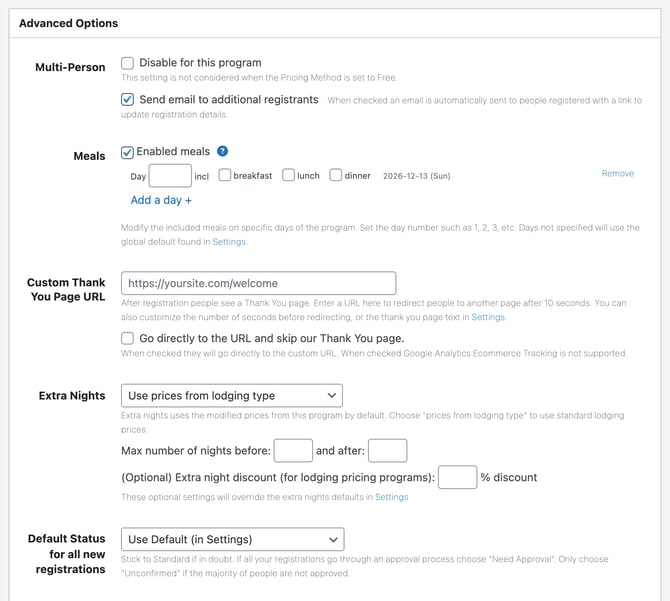
- Multi-Person - guests can register more than one person at once. Tick Disable for this program to allow one person per registration. Send email to additional registrants sends each extra person a link to fill in their own details. See Multi-person Registration.
- Meals - tick Enabled meals to include the program on the meal report and kitchen report. See Meal, arrival and departure reports.
- Custom Thank You Page URL - after registering, guests see your thank-you page, then go to this URL after 10 seconds. Tick Go directly to the URL and skip our Thank You page. to skip it.
- Extra Nights - let guests add nights before or after the program. Choose which prices extra nights use, or Disabled, and set Max number of nights before: and and after:. Extra nights must be switched on at Settings > Registrations first. They are not available on Flexible Dates programs.
- Default Status for all new registrations - the status new registrations start in. Leave it on Use Default (in Settings) unless this program needs something different. For example, choose Need Approval if every registration needs approval.
Your account may also show payment options here, such as Other Payment.
Meal, arrival and departure reports
Two settings decide whether this program's guests appear on your meal, arrival and departure reports.
- Meals in Advanced Options - untick Enabled meals to exclude the program from the meal report and kitchen report, for example for an online event. See Meals and Meal Reporting.
- Reporting Options in Advanced Options - tick Exclude from arrival and departure reports to keep the whole program off those reports. This is an optional feature.
- For one registration, the same feature adds a Reporting Options box to the registration's own edit screen. It holds Exclude from arrival and departure reports, and Exclude from meal reports when the program has meals. Use it for a commuter, for example.
Text customizations
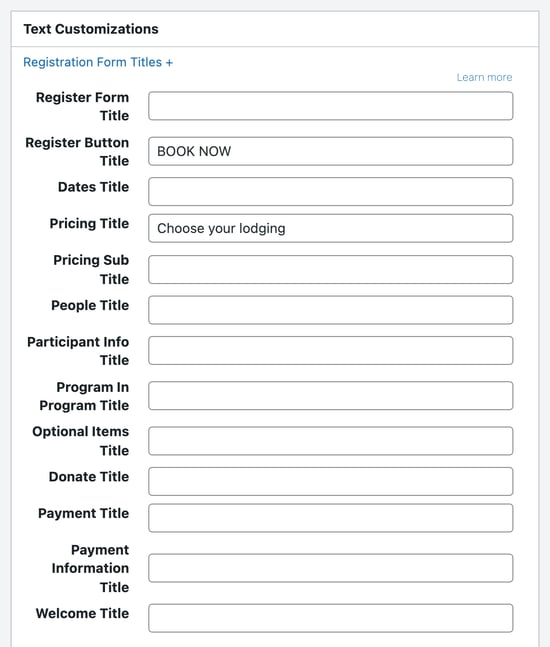
The Text Customizations box changes the wording on this program's registration form, thank-you page, guest statement and waitlist form, among others. Click a section, such as Registration Form Titles +, to open it. For example, Register Button Title renames the register button for this program. A blank field uses the wording from your settings. See Text Customizations.
Email tab
The Email tab lists the emails this program sends, in the order they are sent. Each row reads as a sentence: Send a template, a number of days Before, On or After an event, To a set of guest types. Each row has its own on/off switch.
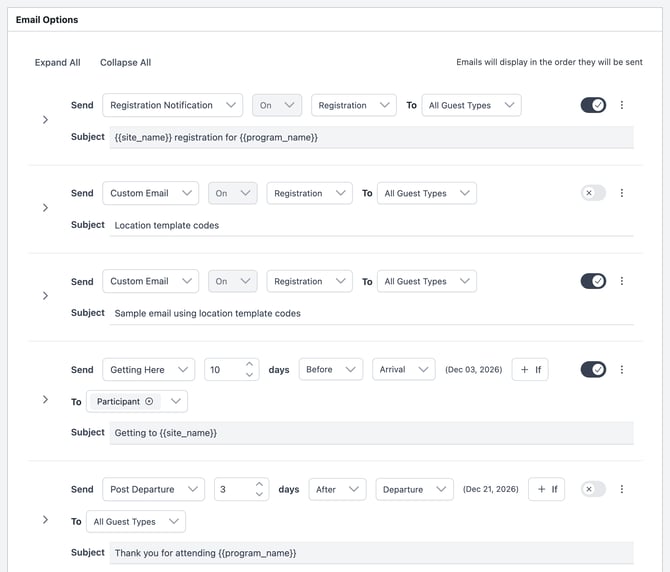
- Every new program starts with two emails: Registration Notification and Post Departure.
- An email that uses a template is read-only on the program. You change its wording at Configuration > Email Templates, and the change reaches every program using that template. To change the wording for this program only, open the row and click Copy content from template.
- Click Add to add another email. A new email is switched off. Switch it on, then click Save Changes.
Registration Notification email
The registration confirmation email is the Registration Notification row. It is sent On Registration, the moment someone registers. Replies to it go to the For more information address only if Set Reply-to to Program Contact is ticked at Settings > Email. See Description and program information.
Pre-arrival emails
Click Add, choose a template, enter the number of days, and choose Before and Arrival. For example, 10 days before arrival.
Pre-arrival emails go out once a day. A guest who registers after the send date still gets the email, on the next daily send. For example, a guest who registers 5 days before a program with a 10-day pre-arrival email gets it the next time the daily emails go out.
Post-departure emails
The Post Departure row is sent a number of days After Departure, 3 unless you change it. Whether it starts switched on for a new program is set at Settings > Email.
Custom notice
Use Custom Notice at the bottom of the tab for a note that belongs in this program's registration email only, such as road works near your center. It appears wherever the email template contains . The default Registration Notification template does.
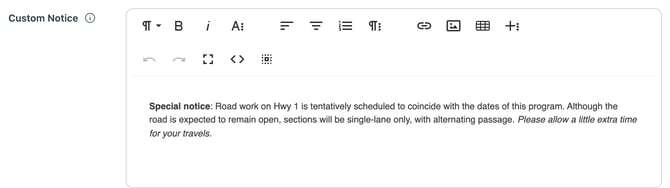
Guest Edit Email, above Custom Notice, sets whether you are told when a guest updates their details for this program. See Emails for conditions, test emails and the full list of templates.
Venues tab
Choose the venues the program uses and the dates and times it uses them. This is an optional feature. See Venues and Planning Calendar.
Advanced tab
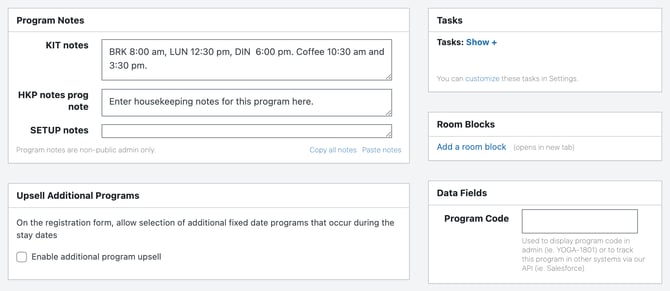
- Program Notes - notes for your own staff, such as kitchen or housekeeping notes. Guests do not see them. See Program Notes.
- Room Blocks - Add a room block sets rooms aside for this program. See Room Blocks and Room Availability.
- Data Fields - Program Code is your own short code for the program, for example YOGA-1801. It shows in the programs list and registrations list, and in other systems connected to Retreat Guru.
- Your account may also show Tasks and Upsell Additional Programs. See Status and Tasks and Upsell additional programs.
Marketplace tab
Sets how the program is listed on retreat.guru, if your account lists there, including its topic. See How to List on the retreat.guru Marketplace.
Groups tab
Sets up remote registration for a group leader, names the event group leader and holds the banquet event order (BEO). This is an optional feature. See Designate an Event Group Leader and Banquet Event Order (BEO).
Check your program before you share it
- In the Publish box, untick Program Pages, Plugins and Marketplace.
- Switch Published on and click Save Changes. The program is live but not listed.
- Click View Program to see the public program page.
- Open the program link in a private browser window and start a registration. Check the dates, prices and questions.
- When it is right, tick Program Pages, Plugins, and Marketplace if you list there, and click Save Changes.
Use a private window because you are signed in as staff. Staff can open the registration form even when the program is full or not yet open to the public, so your own window can show a form your guests cannot reach.
If your program does not show on your website
Check these in order.
- Is Published switched on? Look in the Publish box on the Information tab.
- Is Program Pages, Plugins ticked? A published program with it unticked is not listed.
- Has the List Until date passed? Click List until date + on the Information tab.
- Does your website show only one category? If your website lists a single category, add that category to the program. See Program categories.
- Is your website showing an old copy of the page? Your website or one of its plugins may be caching the program list. Clear your website's cache, or wait and check again.
We love to support you to do what you do best - delivering programs that impact lives.
Are you aware of any additional information we should add? Would you like to suggest a topic for another article? If so, please contact your friendly support guru.