Last Updated: February 2025
Overview
When creating your Retreat Booking Guru installation, all emails you send through will have the "From" address being a special retreat.guru email address (such as register+myretreatcenter@retreat.guru).
Although the email appears as being from retreat.guru, when customers reply to these emails the replies will be sent to the email address you configured with your installation (such as info@myretreatcenter.com).
A "From" address at retreat.guru allows you to get up and running quickly with Retreat Guru, but presents the following challenges to your customers:
- Customers finding emails from your organization within their inboxes can be difficult as the emails are from retreat.guru
- Because the domain name (retreat.guru) is shared by many retreat centers, it may lead to some emails being incorrectly classified as spam.
By validating your domain name and setting a "From" address that is on your own domain, you can improve your deliverability and increase your trust with your customers.
Getting Ready
In order to use a custom domain for sending emails, you will need the following:
- A domain name that you control (i.e. myretreatcenter.com). You will not be able to validate domains from standard email providers like Gmail or Hotmail.
- An email address on your own domain name (i.e. info@myretreatcenter.com).
- The ability to manage and add DNS entries for your domain name. If you cannot do this, contact your web host, web developer, or company where you purchased your domain name for assistance.
Setting up your Domain
To check if your domain name is set up correctly, navigate to:
Settings > Email > Custom Email Domain

When you open this setting, you will see this initially:

The next step is to type in your domain (myretreatcenter.com) and select Check Domain
Once you select this, you will see the entries you need to add in to your DNS Records. Given that you haven't added any entries to your DNS, you will likely receive something similar to this screen:

Below the section with the Not Verified results, there will be another area labeled Add entries to DNS. This provides a quick reference to the required entries that need to be added to your domain name's DNS record in order to send an email on its behalf. Details of each record are explained below.
Please note: In our photo examples you will see Invalid Domain, but in each of these areas you need to type in your actual domain (not myretreatcenter.com) into your DNS records.

DKIM
Create two new CNAME records for your domain:
- Name: mte1._domainkey.myretreatcenter.com | Value: dkim1.mandrillapp.com
- Name: mte2._domainkey.myretreatcenter.com | Value: dkim2.mandrillapp.com
- Don't forget to replace myretreatcenter.com with the domain you're setting up!

DMARC
A valid DMARC record is required. Many times, you may already have one configured for your domain. No action is required if you already have a DMARC record attached to your domain.
If you do not already have a DMARC record attached to your domain, you can create a basic DMARC record by creating a new TXT record:
- Name: _dmarc.myretreatcenter.com | Value: "v=DMARC1; p=none"
- Don't forget to replace myretreatcenter.com with the domain you're setting up!

What is the difference between DKIM and DMARC?
Domain-based Message Authentication, Reporting, and Conformance (DMARC) and DomainKeys Identified Mail (DKIM) are both security protocols for email.
The difference between them, in a nutshell, is that DKIM attempts to verify whether mail is legitimate, and DMARC suggests what to do with mail that isn't legitimate.
Domain Validation
The last requirement is to add another TXT record on the bare domain to prove ownership of the domain name. The value for this TXT record is unique for each domain name and can be retrieved during the step above, where you entered the desired email address within the Settings area in Retreat Guru and clicked Check Domain.

Verify Results
Once all your DNS entries have been added for your domain, return to the Settings area and try your address again. You should see the following results if all your entries were successfully added.
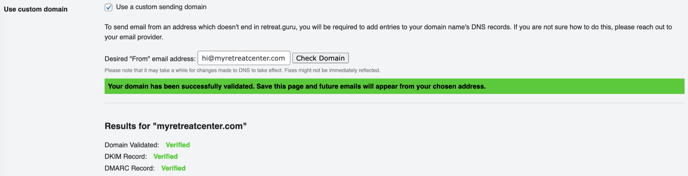
Once your domain has been verified, scroll to the bottom of the page to save your settings to start using your new email.
After saving the settings, you should see your new email listed as the Sender Email within the Email Domain area.

![]() We'd love to hear from you. Did you find this article helpful? Are you aware of any additional information we should add? Would you like to suggest a topic for another article? If so, please contact your friendly support guru.
We'd love to hear from you. Did you find this article helpful? Are you aware of any additional information we should add? Would you like to suggest a topic for another article? If so, please contact your friendly support guru.